DIY Pyramid Easter Box
This year for Easter I didn’t want to give my children the typical buckets, and I said what better time than now, since I’m a crafter mom, let’s make them Easter-themed boxes that are beautiful and that they will like, and this was the result.
In this tutorail, i going to tryit my best to explain step-by-step how I create this master piece, so you can tryit later. This project is easy ans fast to make, perfect for beginners.
Materials Needed
- Cardstock (230 gm)
- Photo paper(230 gm)
To make the image for decor the box - Loklik cutting machine
- Cutting mat
- Glue
- Scissors
- Double side tape
For make 3d effect to the images
Step 1: Create the desing
- I uploaded the file to ideal studio (loklik) from Etsy
- Look for png transparent element on google(image)
- Uploaded to idea studio and use print and cut for the pyramid box and the elements.
Step 2: Cut and Score the Shape
- The file come ready with the score line, You just need to adjust to the size of your sheet.
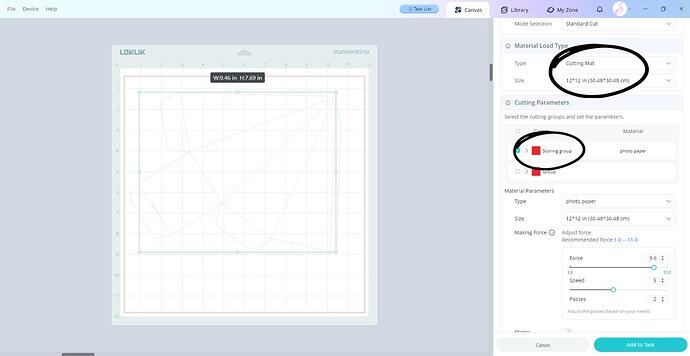
Step 3:Cut mode selection
1: standard cut
2:cutting mat(12x12 in)(30.48x30.48 cm)
3:cutting parameters
what ever color you want to cut first( just select the group that you going to cut first and next select the group you going to scoring line)
4: material parameters
for this project i used photo paper(size a4)(21x29.7 cm)
5: force adjust for cut the box
force(9.5)
speed(5)
passes(2)
6:score line force adjust
force(11)
speed(10)
passes(5)
Step 4:image cut for decor the box
for the image i used print and cut
Step 5:cut mode
for the image I used print and cut
Material load type
cutting mat(12x12 in)(30.48x30.48 cm)
Material parameters
photo paper(230 gm)
paper size letter(8.5x11 in)
force adjust
force(9.5)
speed(5)
passes(2)
Step 6:Assembling the box
1:fold each corners
2:glue the corners
and you have your pyramid box done.
Step 7: Assembling the images
I used fom tape to give a 3d effect to each image.
Step 8: final
when you do print and cut always do a test before.


