Documenting my iCraft story (this installment: calibration and mat woes)

So, I bought the LOKLiK Craft a few weeks ago. I’ve been wanting a cutting machine for quite a while for a variety of things, but the alternatives were frustrating. My background is basically “tech geek / graphic artist / typography nerd,” so my basic things were:

  1. Allows me to import my own images and maintain full control over them.
  2. Allows me to work offline.
  3. Does not hold my ability to work hostage behind a subscription fee.

That’s why I haven’t owned a cutting machine before, but iCraft fit all the core criteria I had. (Also, I refuse to type LOKLiK every time, so it’s gonna be Loklik from now on. Also, I’ll refer to the LOKLiKIdeaStudio application as LLIS from here on out.)

I’ve had it for a couple of weeks now, but it took me a while to configure the office in a way that I could connect to it with a USB cable (Bluetooth is hypothetically nice, but I’ve often found it somewhat less than reliable in reality). I managed that today, so I installed the fine blade that came with the machine, went through the kinda frustrating steps to connect it, upgraded the firmware to v6, and then started with machine calibration.

Now, I have a weakness for the European A paper sizing system; it’s mathematically elegant and fairly pleasing, but I live in the US, which is the victim of centuries of British print sizes that culminates in the “letter size” ANSI A sheet, which is exactly one quarter of the old Imperial demy quarto if you don’t include the trimming margin (1/2 inch, or 12.7mm).

So where I am, “letter size” is pretty ubiquitous and inexpensive, and A4 will probably get some ridiculous tariffs slapped on it at some point, so I’m stuck with that.

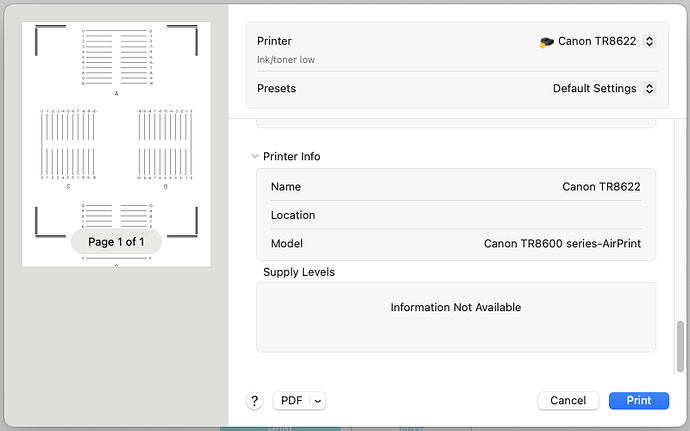
But I can’t print the calibration sheet with letter-sized paper: for some dumb reason, LLIS sharply and unexpectedly reduces the top margin that’s present on the A4 print. As a result, the horizontal calibration lines at the top don’t print completely on my printer (a Canon TR8622—not my choice, but it’s here). The Canon is pretty picky about being told the exact paper sizes that are loaded, so it’s quite a big hassle to change this up.

Now, sure, I could buy a ream of A4 somewhere, but I’m trying to reduce the clutter here (Dad died in September, and I’m cleaning up his old office to work in while I help take care of Mom), and I’d rather not have to deal with that. But I do find it a little strange that LLIS does this.

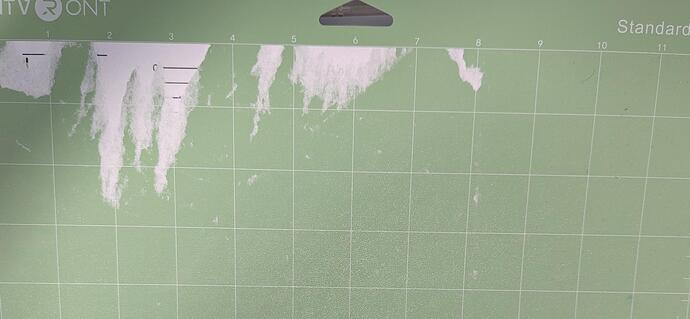
Well, I tried calibration anyway, so I unpacked the “StandardGrip” 12"×12" (30ish×30ish cm) mat and immediately noted that “StandardGrip” was a misleading term. I was expecting something with the adhesion of, say, a strongish Post-It note or thereabouts, whereas this was an impressive amount of adhesion; merely sticking a corner of a sheet of paper onto it, then carefully peeling it away, left the paper sharply curled and slightly delaminated on the back, leaving bits of paper fiber stuck to the mat.

Is that even normal ? That can’t be right.

But I forged ahead anyway, and sure enough, the iCraft reported that it couldn’t read the calibration lines and refused to continue with the calibration.

Fine. I unloaded the mat and started peeling off the paper, which (a) required a tool to get started, and (b) immediately started delaminating. I spent a good ten minutes peeling that off, and I have a piece of paper which cannot be used again as well as a mat with paper shreds left behind on it. I’ve worked with paper for decades, done a number of artistic projects with it, so I’m not just some ham-handed loon when it comes to this.

I feel a bit defeated: first time I have it set up, and completely thwarted.

I’m not sure what to do about the mat; “StandardGrip” should probably be renamed “Say Goodbye To Your Substrate!”, and either I need to wait for another LLIS update that will fix the letter-size margin issue, wait for a ream of A4 paper to get shipped to me—or figure out how to make my own calibration sheet.

And of course, being who I am, I want to make my own.

So what I imagine is that the printed lines are evenly spaced, but the cutting lines on a different layer are off by 0 units, 1 unit, –1 units, 2 units, and so on. The problem? I don’t know what those units are. If one of you could print your own calibration sheet and do some accurate measurements for me (is it 1mm? 0.5mm? less? more?) or get LLIS to tell you, please let me know. Once I find out, I can make a letter-sized calibration sheet (or any dang size you want), and I’d be happy to email it to you. (It would also allow me to fix one of my pet peeves: a hyphen is not a minus sign, dang it.)

Anyone?

As to the mat . . . ugh. I need a sane way to back down the adhesion on this dang thing, because this is ridiculously strong. Do I need to strip it entirely and start over with something else? Is there something I can apply to it that will keep it sticky but not this sticky?
7 Likes

Welcome to the group, I’m sorry you have been faced with frustration.

Regarding your Print then Cut calibration sheet, I don’t think you will be able to make your own as your machine needs the registration marks to read and then understand where it is cutting. Your printer maybe making it smaller as it has margins on it. I have seen people be able to do the print then cut calibration using letter size paper. It normally cuts the B off the bottom but the machine can still read it and complete it. It might be worth looking into your printer margins.

I have this calibration video which might help.

Regarding your mat, you can wash it under warm water and a little bit of dish soap and slightly rub with your hands to get the paper off. Then let it air dry completely. Every new mat I get I give it a hug with my shirt or jumper, this reduces the stickiness of the mat. Standard grip mats (green) are to be used with vinyl and HTV. There are light grip mats (blue) that are used with cardstock and paper. Then there are strong grip mats (purple) that you use with acrylic and leather.

Hope this helps.

5 Likes

It kinda helps. At least the mat part; I’m glad dish soap doesn’t affect the adhesive (I didn’t think it would, but I prefer to know beforehand).

There’s really no problem with making the calibration sheet; I made a PDF of the A4. The registration and calibration markings are the same. The calibration lines are 1pt thick, 6mm apart, and 30mm wide, so that’s easy enough. I assume their placement on the page is critical, because I’m fairly sure that the calibration lines are backed up by cutlines on a different layer that are 1/–1/2/–2/… units offset from that line. Unfortunately, I can’t confirm that because printing the calibration sheet to a PDF doesn’t preserve the cut lines. If I knew what the unit for the offsets were, I could create a new page, new layout, whenever I like.

As far as I know, the iCraft only does recognition of the registration marks at the corners, and doesn’t scan anything inside of those, so given that, it shouldn’t matter where the calibration marks appear so long as the corresponding cut lines match up.

I’ll try the dish-soap/warm-water/shirt treatment on the mat; that will hopefully help a lot—thank you. I still hope someone can measure what the offset units are for me.

(And while I’ve set the margins properly in the OS, and other desktop publishing packages allow me to adjust that, LLIS does not respect the OS settings (I’m on the Mac) nor does it give me an option to adjust it in LLIS.)

3 Likes

I’m working at the moment but I can measure it for you when I’m done.

So, when I print, I can change my print settings with the print dialog box that pops up before it starts printing. Could you send a pic through of the steps you are taking and then the print out. Maybe we can work it out together.

4 Likes

I appreciate that, Belle; thank you.

Here’s the sequence. From a cold start of LLIS:

Then it’s a matter of selecting Device :arrow_forward:︎ Machine Calibration:

Then I select the device (I’m not sure why it doesn’t give me a list of devices I’ve already connected here, or ask me which calibration I want, but . . . ):

Then it’s a matter of telling it I want to calibrate print-and-cut:

Then I have to pick the exact device (and often have to search for it and connect to it, even if I’ve already connected to it before):

And then I have to confirm it for some reason:

Then it asks me if I want to print the calibration chart.

When the print panel comes up, LLIS doesn’t care what paper the printer thinks it’s loaded with: it just assumes A4. But note the preview on the left side, and where the top margin seems to be (the top of the registration mark is 12mm from the top of the page, or just under half an inch, which is plenty of room for this printer).

So I select letter-sized paper:

Just like that, the top margin hikes up quite a bit in the preview pane:

Now, I can walk you through the rest of the print panel, but there’s no option for adjusting the margins here.


And finally, here’s what (predictably) gets printed:

That’s the gist of it.

4 Likes

Also, I can’t seem to find the blue light-grip mats in the Loklik US store.

4 Likes

I hope you’ll find a way to fix your issues with the machine

4 Likes

Hi! You can always find a substitute non-branded mat for your blue mat (light grip) if this is needed to your projects.

4 Likes

I did find the blue light-grip mat at the HTVRONT store, so yay.

6 Likes

Have you tried printing it in A4 I know you have letter paper but it should only cut off the letter B. It allowed me to do it. The calibration should work then. When you get your light grip mat, don’t forget to give it a hug

4 Likes

As I explained at length, as you requested, and showed in screenshots, the top margin shrinks when I select letter-sized paper, thus rendering the top registration marks incomplete, and calibration fails. I get that it doesn’t happen for you—I don’t know what OS you’re using, but I am guessing Windows or perhaps an older version of MacOS—but I did go through it in detail.

Still hoping you’ll measure the total distance of the cuts on the positive and negative scales so that I can calculate the calibration offsets . . .

(That was probably unclear. Basically, I want the distance between the first and last cut lines on calibration blocks B and D, for both the positive scale (0, 1, 2, …, 10) and the negative scale (0, –1, –2, …, –10). I wouldn’t mind getting A and C in addition to that, but I expect they’ll be the same distance as their corresponding blocks.)

4 Likes

Sorry, I might not of been clear with what I was trying to say. Instead of changing it to letter size paper have you tried selecting A4 size? Then having it print the A4 size on the letter size paper. I tried this yesterday and it worked for me. It just cut off the letter B at the bottom, but printed everything else fine.
And I could complete the calibration.

I’ll print a page out and grab all the measurements for you.

3 Likes

Here’s the measurements, let me know if you need anything else. Try just printing it as an A4 bit of paper first. It might save you a lot of work.

3 Likes

As I read over your last two messages, Belle, I see I misunderstood and misspoke.

Previously, when I’ve tried to print A4 on letter-sized, the printer complains that I need to load the A4 tray (this printer, frustratingly, has paper-size–specific trays). It dawned on me a few minutes ago that I could use the rear paper feed and just . . . lie to the printer about what I loaded.

So that worked; I was able to print the page with all the registration marks intact and do the calibration. How I’m gonna get this paper off the mat, though, will be a challenge. (The new lighter-grip mat has not yet arrived.)

From that, I see I was unclear about what was to be measured. I can print to a PDF and load that into my graphic design software (in this case, Affinity Designer, a much cheaper program than Adobe Illustrator), and measure all the printed elements; the measurements I was missing were the cut lines themselves, which are not preserved in the PDF. But now that I’ve done the calibration, I can use a high-resolution scan to multiple measurements (initially, it seems that the positive lines are 6.25mm apart). Once I have those, I’ll swot up a new calibration sheet. I do wish we could adjust more finely than 1 unit, 2 unit, whatever; if LLIS allowed us that, it would be hypothetically possible to create both a normal calibration and a precise calibration.

So: whew. First thing out of the way. Thank you Belle—you’ve given me some good information here. Next step: defining cutting paths, and seeing if I can control the order and direction in which they get cut.

5 Likes

Glad I could help. I think I have the same printer, I was going to say just use the rear feeder. Glad you are progressing :grin: let me know if there’s anything else you are having problems with. I can measure the line lengths, sorry I don’t know why I didn’t measure them

3 Likes

Hi mcglk!

I totally understand the questions you’re asking. These machines are technically made for hobby use, but they work perfectly for more professional/precise/controlled work. I get you completely because I’m a professional too, and I’m basically you—just one year ahead in this journey. Let me try to give you a few tips based on what I’ve figured out from how the plotter behaves:

It doesn’t matter what paper size you use to print the calibration test, as long as the marks fit on the page and are printed at the correct size (no distorted proportions).

What you mentioned about the StandardGrip mat is actually normal. It’s the medium-adhesion mat and the one you’re supposed to use for most things—vinyl, photo paper, anything that needs to stick more than plain paper. The difference between mats is only about stickiness, but it’s relative: as you use them, they get dirty and lose grip, so you’ll soon know whether the StandardGrip still works or if you need to switch to the blue one (the low-tack mat), depending on how clean each one is.

Don’t worry about the paper residue—you can clean your mat. Soak it in warm water with a bit of dish soap. You can use a sponge or even a very worn-out scrubber (very gently!) to help remove stubborn bits. Rinse it and hang it to dry—it will recover its stickiness.

Mats do wear out over time, but you can easily find cheap generic replacements, and even the official Loklik ones are quite affordable.

There are four types:

  • Blue LightGrip: lowest tack

  • Green Standard Grip: medium tack and the most used

  • Purple Hard Grip: for tougher materials that need strong adhesion to avoid lifting during cutting

  • Pink Fabric Grip: higher or special tack for things like fabric (though for fabric there’s also the trick of cutting with interfacing)

I don’t think you’ll be able to make your own calibration sheet—the machine looks for the marks in specific locations. But like I said, you can print the sheet on letter size paper, as long as the scale isn’t altered and everything fits on the page.

Also, I think you might find what I wrote in this other thread useful—you might be overthinking the idea of achieving “perfect calibration,” and it’s honestly more relative than you might think. Search my answer to this topic to know more: “Problema con calibracion Loklik Crafter”

And even though you didn’t mention this specifically, I think it could be useful to you considering your background:

Don’t print from Idea Studio. At least in the part of the software the Crafter lets me use, where I don’t see all those settings shown in the previous screenshots (I only get the printer driver dialog). I’ve confirmed that, in my setup, Idea Studio overrides any settings.

Anyways, you can print directly from the design software you use if you make the marks there or you can simply print your way and then print the margin lines in Idea Studio (that´s on you). I print from Illustrator, because Idea Studio completely overrides your printer driver settings and messes up color profiles. I print in CMYK with full control from a serious design program.

P.S.: If you’re interested in getting software assets for your design hacks, there are some really useful ones inside the installation folders of the program.

6 Likes

You can also place designs below the lower registration marks to make most of the materials used

5 Likes

Yeah I know, I did that before, but stop doing it as I see the cutting precission on the bottom right quarter gets worst.

This used to be my template

Now it´s not

5 Likes

In fact, once you have successfully printed it out and the calibration is completed, just fill in the cutting line values ​​of points ABCD on the calibration table in the software (all values ​​don’t need to be 0) and you can start printing and cutting.

5 Likes