Hello! I don’t know if I’m even posting this is in the right group but I cannot figure out this LokLik studio software. I made a couple of cups and after that nothing is working right. Today, specifically, when I click “upload” either on the left side of the screen or under the file tab nothing happens. I cannot for the life of me grasp the idea of layers. Right now I’m lucky to be able to print one simple anything but it’s like when I try to click “Make” it does nothing and then I have trouble because it wants me to select layers. Even if the laptop says bluetooth is on and I click the machine to connect it, nothing happens. So right now I have to connect with a cord. I just want to make cute gifts and things and this has been such a frustrating experience. I have the HTVRONT Smart Cutting Machine 2. PLEASE HELP! Thanks so much in advance!
Hello, @Amanda_P ![]()
![]() . Welcome to the community. We’re happy you’re here. Yes, you’ve come to the right place.
. Welcome to the community. We’re happy you’re here. Yes, you’ve come to the right place.
I know it can be very frustrating, at first. A new software is always overwhelming. However, once you get used to the software and learn how everything works, I just know, you’re going to love it.
Let’s start with the Bluetooth connection. First of all, make sure you have selected the Bluetooth option on the Connect screen, it should be highlighted white. Then, click the arrows wheel or the Connect option. It will search for your machine. Once it finds it, click Connect. The machine will make a noise and do a little dance—as I call it. Once it’s finished connecting, click Complete Connection at the bottom of the box. If this doesn’t work, it could be for the following reason: Sometimes a computer’s Bluetooth driver will become outdated. So you will need to either reinstall a Bluetooth driver, or do as I did, purchase a 5.4 Bluetooth USB dongle from Amazon. They’re very inexpensive, and easily plug into your USB port. It worked perfectly for my connection issues. If your Bluetooth driver is still intact and working, you may need to move your cutter within 16 feet of the device.
When trying to upload images from your files, you may need to just wait a little bit for the file manager window to pop up. It doesn’t open instantly, it just now took mine a good 20-30 seconds to pop up, as well. Then you should be able to select your file. If your image is too large, you will need to select “shrink” when prompted. If it’s not working, maybe an app restart will help.
Once your image is on the canvas, you can select the Design tab on the right hand side and remove background, transfer to an AI image, adjust brightness/contrast, enhance clarity, turn your image into just line art, or an oil painting. If you want to print then cut, you’ll need to remove background with the Image Matting tool, then select the print then cut option to create the offset around the image — which will be where the machine cuts. To make the offset you may need to expand it a few times to make sure it isn’t cutting into your design. Where the blue marks are is where it will cut. So keep expanding until it has the correct areas that you want cut highlighted in blue. If you want to do a standard cut, you will select Standard Cut, and it will then make an SVG (cut file), which will break the image into cutting layers. Each layer is a different color or element, as you will need to cut out each layer separately. If some elements are the same color, and you’ll be cutting them from the same material, you can group them together and cut them on the same material. Just be sure to arrange them on the canvas to where they won’t interfere with each other when cutting, then select/highlight all of those layers before you click Make.
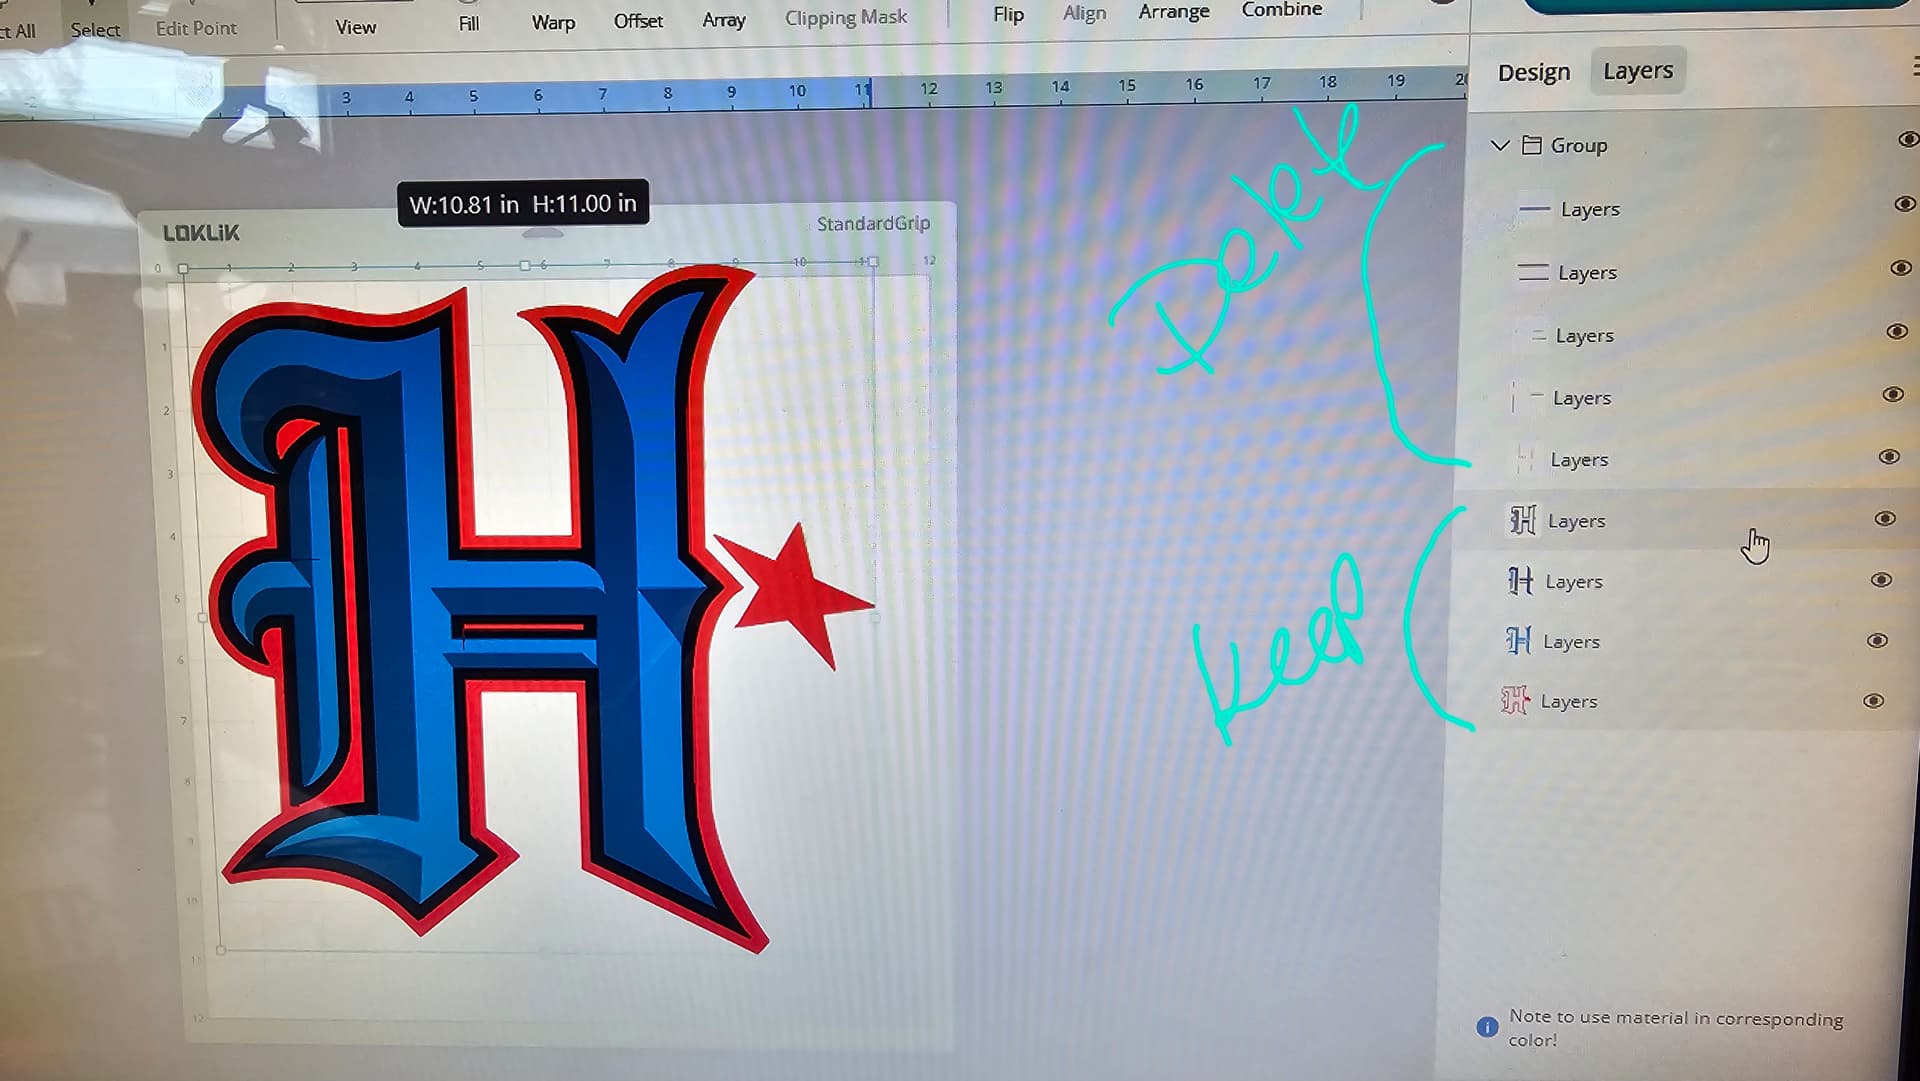
Now, for the layers panel, the layers are all of your elements that are to be cut. If the image you changed into an SVG used colors you didn’t even realize were in the image, you can select the layers and delete them, if they were just slits. (See photo) That’s what I do, and keep the layers you wish to cut.
Now for cutting. You will need to select the layers you want to add to the task bar for cutting. This is a must, otherwise, the machine won’t have anything to do. So highlight the elements you want to cut, then click Make. This will take you to a screen where you will choose the type of operation you want to perform. Click Standard Cut for cutting vinyl, cardstock, vellum, etc. If you’re trying to perform a Print Then Cut, select that option. Or if you’re using the pen and want to draw, select Draw. Once you select Standard Cut, it will show you a list of the layers you selected. If all of the layers are of the same material and brand, you can select the box right next to Colors, and it will select all of the layers for you. If you’re using different types of materials for different colors, you will need to select each layer individually, and adjust the settings based on the materials you’re using.
You can select the Loklik, HTVRONT, or Other brand. Select the material you’re using from the list. If using Other Brand, you will need to create your own force and passes. Let’s just stick with the HTVRONT option for now, as they have the most materials listed in that category. You can choose the material you’re using. If you’re using either Loklik or HTVRont brand this is the easiest, as you can select default. Default already has the recommended settings for that material, and will most likely make a perfect cut. If you’re not using either of those brands, you will probably need to play around by making test cuts until you have the perfect settings for a perfect cut. I highly suggest using HTVRONT or Loklik brand materials, especially at first, until you get a better understanding of how the whole thing works. If you’re using HTV, you will need to mirror the design. This will make sure the design is facing the correct way when you press the vinyl onto your desired blank. For faux leather, you will lay the “leather” side down, so you WILL need to mirror for that, too. For permanent adhesive vinyl, cardstock, vellum, etc., you won’t need to mirror.
I think I covered everything. I hope this helps you.
If you have anymore questions, please feel free to ask. I will try to help you as best as I can. Let me know if any of this worked or didn’t work, and we’ll see if we can find a solution to your problem. Until then, good luck, Happy New Year, and have a fantastic day! ![]()
Hello Amanda @Amanda_P welcome to the community, @Samantha_Bryant has some great advise, let us know how you get on.
I can add this about the upload not working for you… I have had this happen a few times as well, so i made sure to save any work, if any on the mat and close down the LLiS software and open it again, then the upload works again.
Working with layers does take a bit of practice no matter what software you use, my advice is to practice. If you are wanting to see some great beginner video’s have a look at Belle’s channel here