Hi everyone!
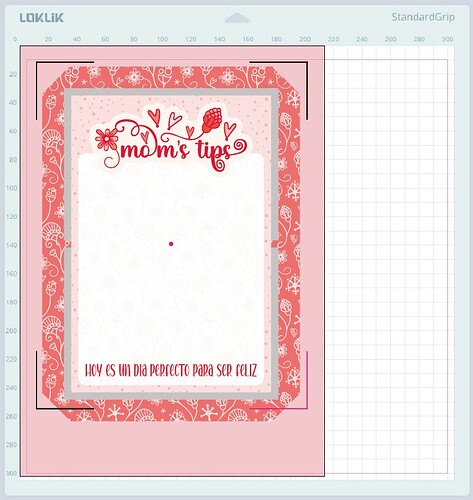
I’d like to share a special Mother’s Day card I made. It’s not just a card – it’s also a little whiteboard that can be reused every day, either on the fridge or on a desk. ![]()
![]() Materials I used:
Materials I used:
- Cardboard (to give structure)
- Printable adhesive vinyl (for the floral pattern on the cover)
- 210g photo paper (you can also use scrapbook paper or any decorative paper that can take glue)
- Adhesive contact paper (used for book covering).
- Magnetic sheet
- 10 cm of red elastic 0.5 mm cord
![]() Tools:
Tools:
- Loklik Crafter
- Cutting mat
- Cutter
- Tombow Aqua glue
- Scoring tool and bone folder
- Loklik scraper
- Heavy book (to press and flatten)
- Bone folder
![]() Design process:
Design process:
I created all the designs in Adobe Illustrator, including the floral patterns. I printed directly from Illustrator and used Loklik Idea Studio for all cutting tasks. This included floral labels and cut flowers to decorate the envelope.
The main label on the front says:
“Mom’s tips R always smart”
Inside the card, there’s another label:
“Mom’s tips”
Below that, I added a positive message in Spanish for everyday motivation, not just for Mother’s Day:
“Hoy es un día perfecto para ser feliz” - Today is a perfect day to be happy.
![]() Why a whiteboard card?
Why a whiteboard card?
My mother loves leaving notes, reminders, and advice on the fridge. So I thought this would be a sweet and useful gift: a mini whiteboard she can reuse to write her daily tips or remainders. The front label is glued on a piece of magnetic sheet, and inside there’s a small loop of elastic to hold a whiteboard marker. (Although the one I´m including has a magnetic cap too).
![]() Step-by-step:
Step-by-step:
- I glued the cover paper (already laminated with contact paper) onto the cardboard.
– The decorative paper is 1.5 cm larger than the board to fold the flaps.
– The contact paper has a 1 cm margin over the cover paper.
– I left a 0.5 cm gap between the two cardboard pieces to allow folding.
– I used the Loklik scraper to flatten everything and avoid bubbles. - Then I glued the inner printed panel and laminated it with contact paper.
– This inner layer is the actual whiteboard surface – and it works great! - After drying, I pressed it for a while under a heavy book.
- I scored the fold lines carefully using a bone folder to avoid cracking the papers.
- With the Loklik Crafter, I cut a 3 mm hole through the front and inside panel to thread the elastic for the marker.
– I tied it into a decorative bow outside, but it could also be hidden between layers during assembly.
![]() Optional ideas:
Optional ideas:
While making it, I had lots of extra ideas to improve or adapt this project:
- Add a string or cord at the bottom front to use it as a hanging board, and also to close the card by wrapping it around a button on the back.
- Include magnetic buttons hidden under the paper as a closure.
- Use leftover bits from other crafts to customize it further.
- I also made a few flat whiteboards for my desk. Since those won’t get as messy as this one (which is meant for the kitchen), I didn’t cover them with plastic. Instead, I used the backing paper from the printable adhesive vinyl I work with — it turns out to be a perfect whiteboard surface.
![]() Final thoughts:
Final thoughts:
Now I just need to decorate the envelope and wait until tomorrow to give it to my mother — Mother’s Day in Spain is the first Sunday of May.
This little whiteboard card was so fun and easy to craft, and it’s definitely handy to keep around! ![]()


