![]() Step 1: Design process
Step 1: Design process ![]()
Open up LOKLiK Idea Studio. We are going to create our card base first. Click on Pattern and then click the square. Now draw a rectangle on your canvas. Now with your rectangle selected click on the padlock button above size in your tool bar. Now change the width to 210 mm and the height to 180 mm.
Now let’s make the card face panel. Click the pattern button again and click the square. Draw another rectangle. Now resize this rectangle to be width 195mm and the height 75mm. You can also change the colour to white using the fill button.
You can also change the card base panel to any colour you want as well. I chose pink but later changed everything to purple. I like purple.
Now you can create a scoring line by going to the pattern button and clicking the dashed line.
Now you can draw the score line across the base card rectangle.
Now you can centre the score line in the middle of the card base by selecting both the card base layer and the scoring line layer. You can highlight a box around the two to select both layers and then click align and then centre vertically.
Now let’s head to the library and add our design to the canvas.
Now we have the eggs on our canvas. Now you can leave them as is or you can change up the colours. I want the eggs to match the cardstock colours I am using, so I’m going to change the colours.
Now you can go through the layers and find the colours that you want to change. Let’s do the first one together. So I’m going to change the colour of the dark egg first. So I found the layer.
With the layer selected you can then head to fill and then choose the colour you want.
Now I changed all the 3 colours used in the eggs with 3 different pinks. I used the same dark pink wherever there was the dark grey colour, then I used a lighter pink for the lighter grey colours and then lastly a tan pink for the very light grey colour.
Now let’s resize the eggs so they fit on our white card face. I also duplicated the eggs so I could get size and position right.
Now let’s create an offset for each egg. To do this we need to ungroup the egg layers. Now we can select the first egg by drawing a box over the first egg.
Now we can click the group button. Do this step for each egg.
Now create an offset of each egg. Select the egg and then select offset. I put my offset to .5. Then change the offset to white. Now repeat this step for each of the eggs.
Now select the eggs and the offset layers and duplicate them using ctrl c + ctrl v or cmd c + cmd v. I created 7 eggs so they fit nicely along the bottom of the card.
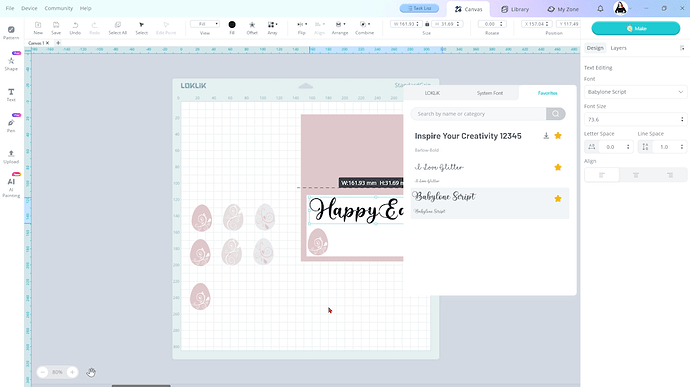
Now let’s create our sentiment for the face of the card. Click on the text box and then double click in the text box and type Happy Easter.
Now resize the font to fit on top of the eggs. You can also change the font style by clicking on design in the layers panel and choosing your font. I used Babylone Script.
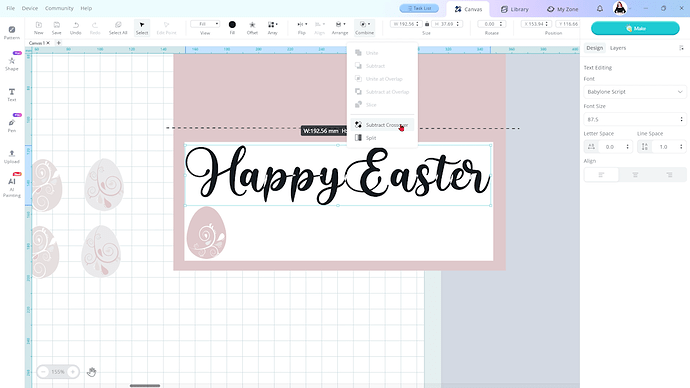
If your font looks like this you need to click combine and then subtract crossover. This will make the machine cut the entire word out instead of cutting out each letter individually
Now I want to layer the Happy Easter so I can get some dimension on my card, so I duplicated the words so I had 3 copies.
Now I want my machine to write my message in my card because I have horrible hand writing. So create a duplicate of our white rectangle.
Then I added another Text box and wrote my message for the inside of my card. Don’t forget you can change the font and size your text to what you want. Don’t forget to subtract crossover if you have broken text.
![]() Step 2: Cutting out our card pieces.
Step 2: Cutting out our card pieces. ![]()
Connect your device. I am going to do the print then cut job first. Highlight the eggs and the offsets of your eggs. Then you can add the print then cut boarder on the canvas so you can adjust where you want your eggs to print them.
Now with your eggs and offsets selected press make. Select cut, now under mode selection select print then cut. Now press start printing.
Now to make it easier to find the offset layer I changed all the offsets to black after I printed the eggs. When you are doing this make sure you don’t move any of the eggs other wise it won’t cut properly. I then selected all of egg and offset layers and selected make again.
Now in the make screen, select already printed and then select the black group layer. Now I was using 210gsm cardstock so I choose Self adhesive glossy photo paper as the material type. Press add to task.
Now in the task list you can see the egg offset layers ready to cut.
Put your print out on your light grip mat in the top left corner.
Load your mat into your machine
Press start on your task list. Your machine will read the registration marks first then it will start cutting out the eggs.
Unload your mat when the machine is done. Turn over the mat and start peeling the paper away from your mat.
Now let’s cut out our front face panel of our card along with the inside panel of the card. Along with the writing our little message in the card.
Select those layers and then click make. Now we are going to have our machine write our message first. So select draw. Then select the black group.
For the material select Default and then add to task.
Now I want to cut out the white panels after the machine writes. So up the top select cut.
Then select standard cut. The white group as that is our white panels. I choose the shimmer cardstock for my material and then add to task.
Now on our task list we have a panel cut job and our draw job. We are going to do the draw job first so let’s get the machine ready.
Grab your pen and your pen housing that came with your machine. Unscrew the bottom of the pen housing making sure you hold the top of the pen housing while unscrewing. Now put your pen with the fine tip head first in to the pen housing. Now screw the bottom of the pen housing back on making sure to hold the top of the pen housing.
Now on your machine release the clamp lever and take out your blade housing. Insert your pen housing into the holder. I always hold the bottom of the holder with my finger. Then lock the clamp lever back in place.
Now load your mat with your paper. Remember to place your paper on the part of the mat where your design is in LOKLiK Idea Studio. Mine was down the bottom left.
Now load your mat into your machine and then press start on the draw job. I love watching my machine draw and write, it’s amazing.
Now after your machine is done drawing don’t unload your mat. Take out the pen housing and put your blade back in.
Now press start on the standard cut job in your task list.
Wait for your machine to finish then unload your mat.
Flip your mat face down and then slowly bend your mat away from your cardstock.
Now let’s cut out our remaining pieces. If you have the scoring tool you can insert the scoring tool into your machine. Select score and then add the black group. After adding the group make sure the score line is highlighted. Select your material and then add to task.
Select standard cut and then select the pink card base layer. I chose cardstock paper setting for my material, then I added to task.
You can also add the words to our task list. Select cut, then standard cut. Select the green group. I chose Cardstock paper for my material type then I clicked add to task.
Now load your mat ready to cut and score the card base. My card base is in the top left corner of LOKLiK Idea Studio So that’s where I put my cardstock on my mat. Load your mat.
Now if you have the scoring tool follow the same steps we did for the drawing function. Unload the blade and place the scoring tool into the clamp. Select the scoring job in the task list and wait for your machine to be finished. Then without unloading the mat, take out the scoring tool and put the blade housing back in. Then select the standard cut job in the task list to cut out our card base.
Once finished unload your mat and flip that mat over removing the cardstock from the mat. Then load your mat again for our last cut. Then cut out the words for our card.
![]() Step 3: Assembling the card
Step 3: Assembling the card ![]()
Now with all our pieces cut out for the card it is time to assemble it.
First we are going to glue our message panel into the inside of our card.
If you have trouble lining it up it helps to stand up and hover over it directly. Then you can see all the sides and align it correctly.
Then we can glue our front panel on our card in the same way. I put something heavy on top of the card while it was drying.
While the card base is drying we can start glueing our words together.
You don’t need heaps of glue to do this. Just take your time. You can slightly push and pull the layers to line each word up before the glue dries.
Once all the word layers are glued together you can glue the words on the front panel of our card.
Lastly glue all the ends on to the front panel of the card.
Now your Happy Easter Greeting Card is complete


