

Project Overview:
Warmer weather means more fun in the sun! Let’s make this cute Summer Fun Popsicle banner for our next outdoor playdate. The best part is that design is available on the LOKLiK IdeaStudio library for free.

Materials:
- Cutting machine: LOKLiK iCraft
- Sticky mat: LOKLiK standard grip
- Cardstock: 60 lb or equivalent
- Craft glue and hot glue
- Craft foam
- Twine string
- Templates: from LOKLiK Library
**Free Cartoon and Popsicle SVG
Design and Cutting Process:
-
Using the LOKLiK IdeaStudio Library, search for the template and select the + to add the template to the canvas.
-
Right click on your mouse and select to ungroup the SVG. This will allow us to edit each component of the SVG for our project.
-
Create a copy of the popsicle part (ice pop and stick).
-
The copy will be used to create a base for each of the banner pieces. The SVG is broken up in pieces so in order to cut both the ice pop and stick as 1 piece, you will need to follow these steps.
-
Select the ice pop and stick portion and using the Offset feature, create an external offset. I created a .4mm offset.
-
Only select the offset you created and using the Offset feature, create an internal offset. I created a .4mm internal offset, this should be the same offset size as the external offset.


- These steps will help you be able to create the base of each banner

A crafting tip: when making a banner adding this part will help you thread the ribbon to create the banner while keeping the front of the banner intact and beautiful.
-
Begin by using the “Shape” feature and adding an oval rectangle measuring.
-
Make sure you unlock the sizing restriction in order to resize the part as needed.
-
Resize the oval rectangle to be 1.70in wide by .63in tall.


-
Using the “Shape” feature and add 2 small circles measuring .2in wide and place them like the photo below.
-
Use the Align feature and select Center Vertically to ensure that they are placed in the center (from top/bottom).
-
Add score lines using the pattern feature and selecting the dashed line option instead of a solid line.


-
Select the Text feature and type in the saying of your choice. For this tutorial, I used “Summer Fun”.
-
I used one of the LOKLiK fonts to create this banner, it was called “Bubble”
-
Using the Combine feature, select the Split option. This will allow you to change the colors of each individual letter.
-
As you see in the photo below, the Split option removed the small cuts/details and the center for the “R”.
-
In order to correct this, select each letter one at a time. Use the Combine feature and select subtract.
-
Select each letter and change the fill color to your preferred color.
-
Select the letters and create an offset to add dimension to the banner. I selected an offset of 1.6mm and recolored it white.
-
Select the white offset and create another offset, I selected a 1.1mm.
-
I wanted the bottom layer of the lettering to be colorful and in order to change the color, I had to use the Combine feature and select Split.
-
In order to have the center of the “R”, select the R and the center and Subtract it.
-
Recolor the bottom layer to your preference, below is the example of the coloring I used.
-
Copy the components of the ice pop base, the ice pop, the 3 decorative lines and the stick accent to your canvas. For this tutorial, I needed 9 copies, 1 for each letter.
-
You know have all the components made for the note holder, here is a preview of all the components.
-
Send the components to cut and score, below are the settings used for this tutorial.


Cut Settings
Material Type: Cardstock Paper (180g/97lb)
- Force: 7.5
- Speed: 5
- Passes: 2
Score Settings
Material Type: Cardstock Paper (180g/97lb)
- Force: 5.5
- Speed: 5
- Passes: 2
Assembling the banner:
-
Glue the ice pop and the stick accents to the ice pop base using craft glue. Repeat this for all of the popsicles.
-
Separate the cutouts of the letters and the offsets to help with the assembly process.
-
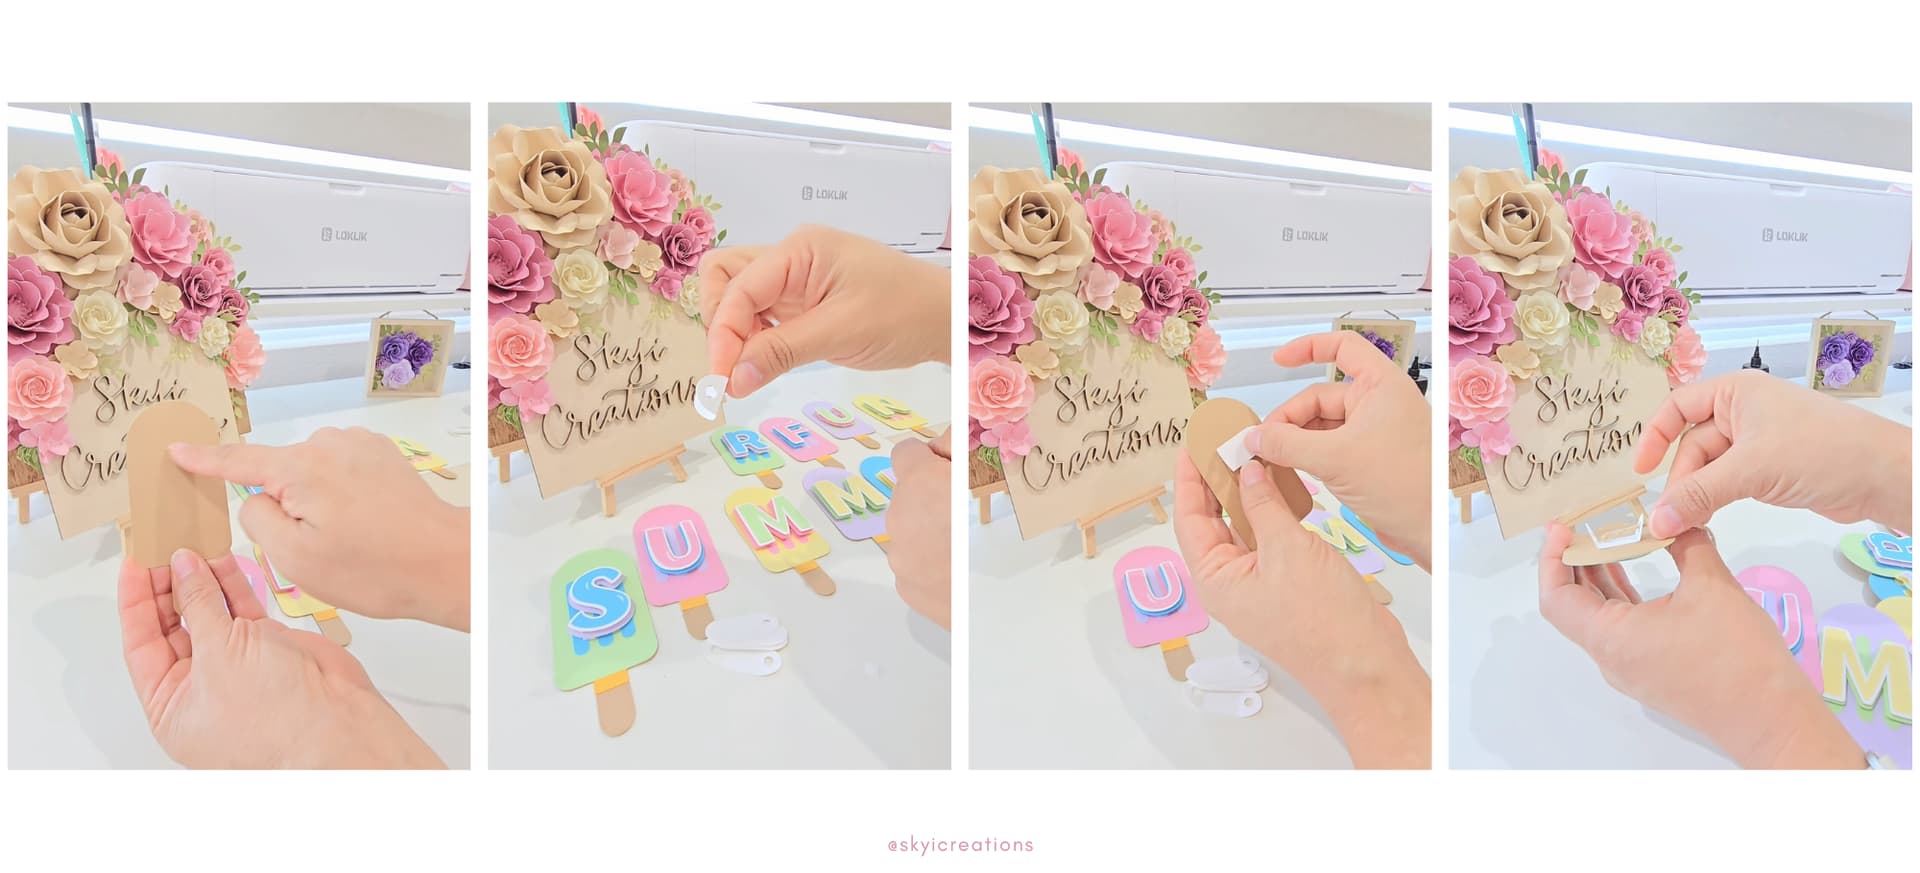
Attach the bottom base of the letters to the middle white letters with craft foam.
-
Glue the top lettering using craft glue.
-
Glue the ice pop lines to each ice pop using craft glue.
-
Arrange the completed ice pops in a row and place them in the color sequence that you prefer. This step to me is a little silly but I have learned that it helps me lay them out to make sure I like the layout prior to glueing the lettering. I keep an eye out to make sure the same color is not next to each other.
-
Using crafting foam, place each layered letter on the popsicles.
-
Using craft glue, add the banner loop piece. Make sure that you gently crease the score marks and glue the flat side to the middle/top portion of the popsicles. The flaps should be facing upward.
-
Using a twine ribbon, string the twine thru the holes. I started with the last letter of the banner and worked thru to the first letter.


**WONDERFUL!!! You have created a cute summer banner perfect for your next gathering.
