
My daughter’s Birthday is coming up soon and I want to make her a cute cake topper for her birthday cake. She loves dogs like me, so I found this really cute dalmatian cake topper from Creative Fabrica. All the links to everything I use is in the video description below.
![]() Materials Needed
Materials Needed ![]()
- LOKLiK iCraft
- Computer
- Light Grip Cutting Mat
- Brayer
- Cardstock 180 to 210 gsm in different colours
- Glue
- Foam Squares
- Tweezers
![]() Step 1: Downloading your design
Step 1: Downloading your design ![]()
You could use any design and follow my steps or you can grab the same design as me from Creative Fabrica. Download your design. Most designs come in a zip folder. You need to extract that folder.

Now you can upload your design into LOKLiK Idea Studio. Press the upload button, locate your file where you saved it and press open.

![]() Step 2: Customizing our design
Step 2: Customizing our design ![]()
With the whole design selected, resize your design by using the little arrow on any of the corners.

Now my daughter is turning 13 so I am going to hide all the other numbers apart from 1 and 3. To do this open up the layers panel, scroll down until you find the numbers group. Now select the number you don’t want and press the little eye button on the right-hand side of the layer.

Now I want to add her name to the banner at the bottom of the cake topper. Select the text button

Double click inside the text box and type your name, or if you want to you could write Happy Birthday.

I’m going to change my font to babylone script, it’s one of my favorite fonts to use. Under the design panel, select the down arrow on font. This is a font from my computer, so I chose system font. LOKLiK Idea Studio has free fronts that you can use.

Now I resized my font, so it fits within the banner. Because this font is cursive, I need to use the Subtract Crossover function otherwise my letters would cut through other letters. Using this function tells the cutter to cut around the word and not the individual letters. With the word selected go to combine then in the drop-down list select subtract crossover.

Now let’s create an offset for our name to sit on. Click the offset button and move the slider up or you can manually type in your offset number. You can see the offset around the word displayed by the blue line. Click apply when you are happy with the size.

Now I want the word and the offset colors to match the other colors in the design. Select the layer and then select fill. From there you can select the eyedropper tool and click on one of the colors in your design. Now your word exactly matches your design colors. Do the same process for the offset. I used pink for my word and red for my offset.

![]() Step 3: Cutting the design
Step 3: Cutting the design ![]()
Making sure none of the same color layer is on top of each other, select all the layers. A short cut to do this is ctrl + A for windows or cmd + A for Mac. Then select make.

Connect your machine then select Standard Cut

We are cutting on a mat so you can leave that. You can select the group you want to cut, my example is pink.

Then scroll down to material parameters, click the down arrow under type and choose your card stock setting. I’m using the Kraft Card Stock Paper setting.

Then select add to task

If all your cutting settings are the same for each cutting group, you can select them all and select the cutting parameter, then add to task.

Now let’s place our material on to our mat. Be mindful where the design is in Idea Studio, because that’s where your machine will cut it out on your mat. My design is in the top left corner of my mat, so I’ll place my cardstock there.

Now use that brayer tool to press your cardstock into your mat so it’s nice and stuck. Most of the time cardstock projects fail is because the cardstock wasn’t stuck down on the mat enough.

Load your mat into your machine. Keeping some pressure at the back of your mat and making sure your mat goes between the mat guides on the machine, press the load button.

Then press start on your computer

Wait for your machine to finish cutting out your design.

Unload your mat when your machine is done. Gently bend your mat back and slowly peel your design away from the mat.

Repeat this for all the other layers until they are all cut out.
![]() Step 4: Assembly
Step 4: Assembly ![]()
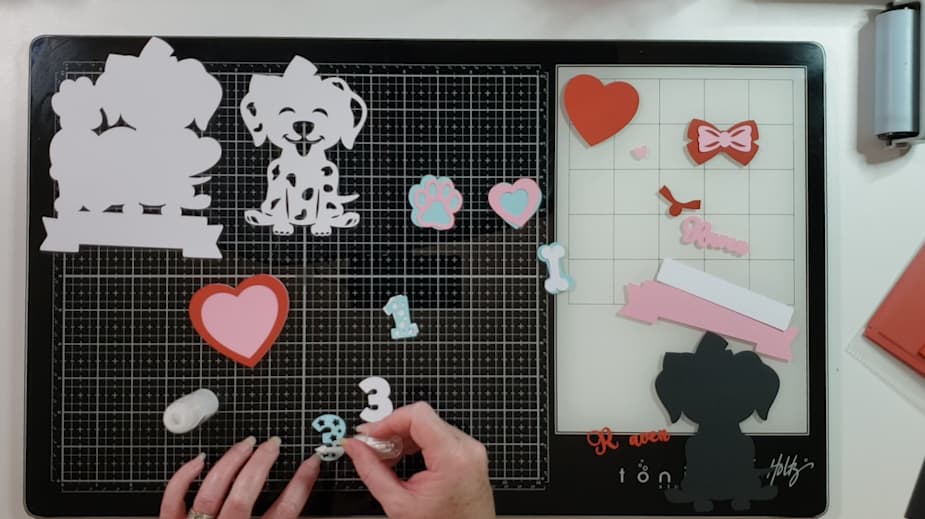
Lets put our cake topper together. Start by gluing all the little pieces together. Like the blue number 3 with the white number 3. If you have trouble finding which side is the right way up. Look at the cut edge of your piece, you will see a slight raised area on one side. The raised area is the side that faces up.
Once you have all your loose pieces glued together, we can then start attaching them to the cake topper back.

Start by gluing the banner down first

Then glue the dog down, notice the dog paws go over the banner

Then I placed foam squares on to both hearts and the dog paw. Then stuck them down.


Now with the bone, I placed 2 bits of foam tape on top of each other on the bottom part of the bone. Then I placed 1 foam piece on the top. The bone goes over the heart which is raised already so the bone needed two foam pieces on the bottom so it could stick to the base of the cake topper.

Now your cake topper is done. I normally just use some wooden skewers and stick them to the back of the cake topper with hot glue gun. Then you press the skewers into to the cake on the special day. It’s not her birthday yet so I need to hide this until then and it’s easier if I don’t put the skewers on.

If you have any questions leave them in the comments below, I’m happy to help. You could easily follow along using your LOKLiK Crafter machine too. If you want to craft along with me check out my tutorial video.


