Project Overview:
I made a cute Lucky Charm gram for my hubby using the LOKLiK iCraft. It’s the little crafts that make holidays and celebrations memorable. The LOKLiK Idea Studio library had the perfect free template that was used to design the charm. The LOKLiK iCraft drawing pen allowed me to add a message to the perfectly cut clovers.
Materials:
- Cutting machine: LOKLiK iCraft
- Sticky mat: LOKLiK standard grip
- Cardstock (65lb or equivalent), I used the Michael’s Recollection
- Template: from LOKLiK Library, “St Patrick’s Day Clover Patrick"
- Craft glue
- Twine or string
Design and Cutting Process:
- Using the LOKLik IdeaStudio Library, search for the template and select the + to add the template to the canvas.
Your canvas would like similar to the photo below.
Now it is time to take this clover shape and transform it into a folding paper charm. For this tutorial I will be using 2 shades of green cardstock but you are able to use any color combination you would like.
Creating the combined clover:
- In order to create the main part of the project, we will need to copy/paste the clover.
- Click on the second clover and select the “flip” tab and select “flip vertically”
- Using your mouse, move the clover on the right to the top edge of the left clover. You will need to rotate the clover to help it align properly.
TIP: Use the heart shape area of the clover to align the 2 pieces. I ensured that the center inner peak lined up on the canvas grid to help me see when they were aligned.
Now it is time to combine the 2 clovers so they cut as 1 piece.
IMPORTANT NOTE: Make a copy of the 2 clovers prior to combining them in case you need them detached in the future. Once you combine them, you will not be able to separate them.
- Select both clovers and under the “combine” tab select “unite”.
- Rotate the combined clover 90 degrees and make 3 copies of the clover set. You will now have 4 clover sets and can arrange and resize them to fit on your material size.
For reference, I am using a letter size cardstock (8.5in by 11in) and had each clover set measure 6.21in by 2.94in
- Using the add text feature, type in your special message.
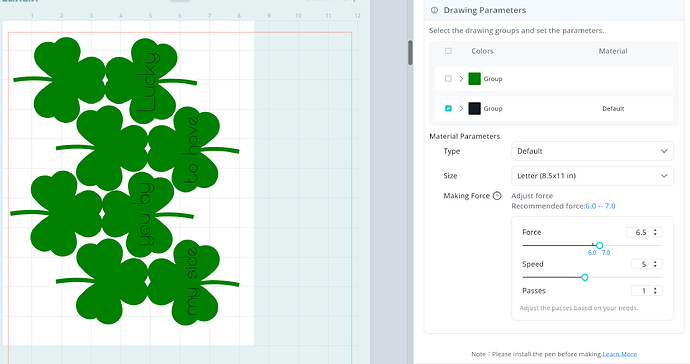
- I used 4 text boxes and a font from Idea Studio
- Rotate the text and resize text to fit inside the clover.
Now create a base for your charm
- Using the original clover, you can resize it to match the clover set created and add an offset to the shape. For my project, the single clover measured 3.15in by 2.92in and created an offset of 10mm.
- Replace the blade on the iCraft with the pen holder and LOKLiK pen.
- Send the drawing part of the project to make
- Followed by the cutting of the 4 clover sets and 1 offset.
Settings Used
-
Draw Setting Used
- Material Type: Default
- Force: 7.5
- Speed: 5
- Passes: 2
-
Cut Setting Used
- Material Type: Cardstock Paper (180g/97lb)
- Force: 7.5
- Speed: 5
- Passes: 2
IMPORTANT NOTE: Remember to go thru the “draw” tab when sending the letters to draw.
Assembling the Charm
- Fold each clover set in along the middle section so that one side folds over the other.
Make sure the text is in the inside of the fold as the top/bottom areas will be glued on - Arrange the folded clovers in order according to the message you have written.
- Place the first clover on top and continue placing them under.
This is where you want to make sure to pay attention before you glue. You will be gluing the top flap of a clover to the layer above it. Make sure that the text is facing in the right direction and can be read
- Place glue on the top flap of the bottom layer clover and place the second to last clover on top of it. Continue with the next 2 clover layers.
- Glue the clover sets to the base using the bottom layer clover
- Tie a bow around the charm to hold it closed.
Great job! You have now designed and created your own St. Patrick’s Clover Charm.
Make sure to share your projects with me. I am excited to see them.


