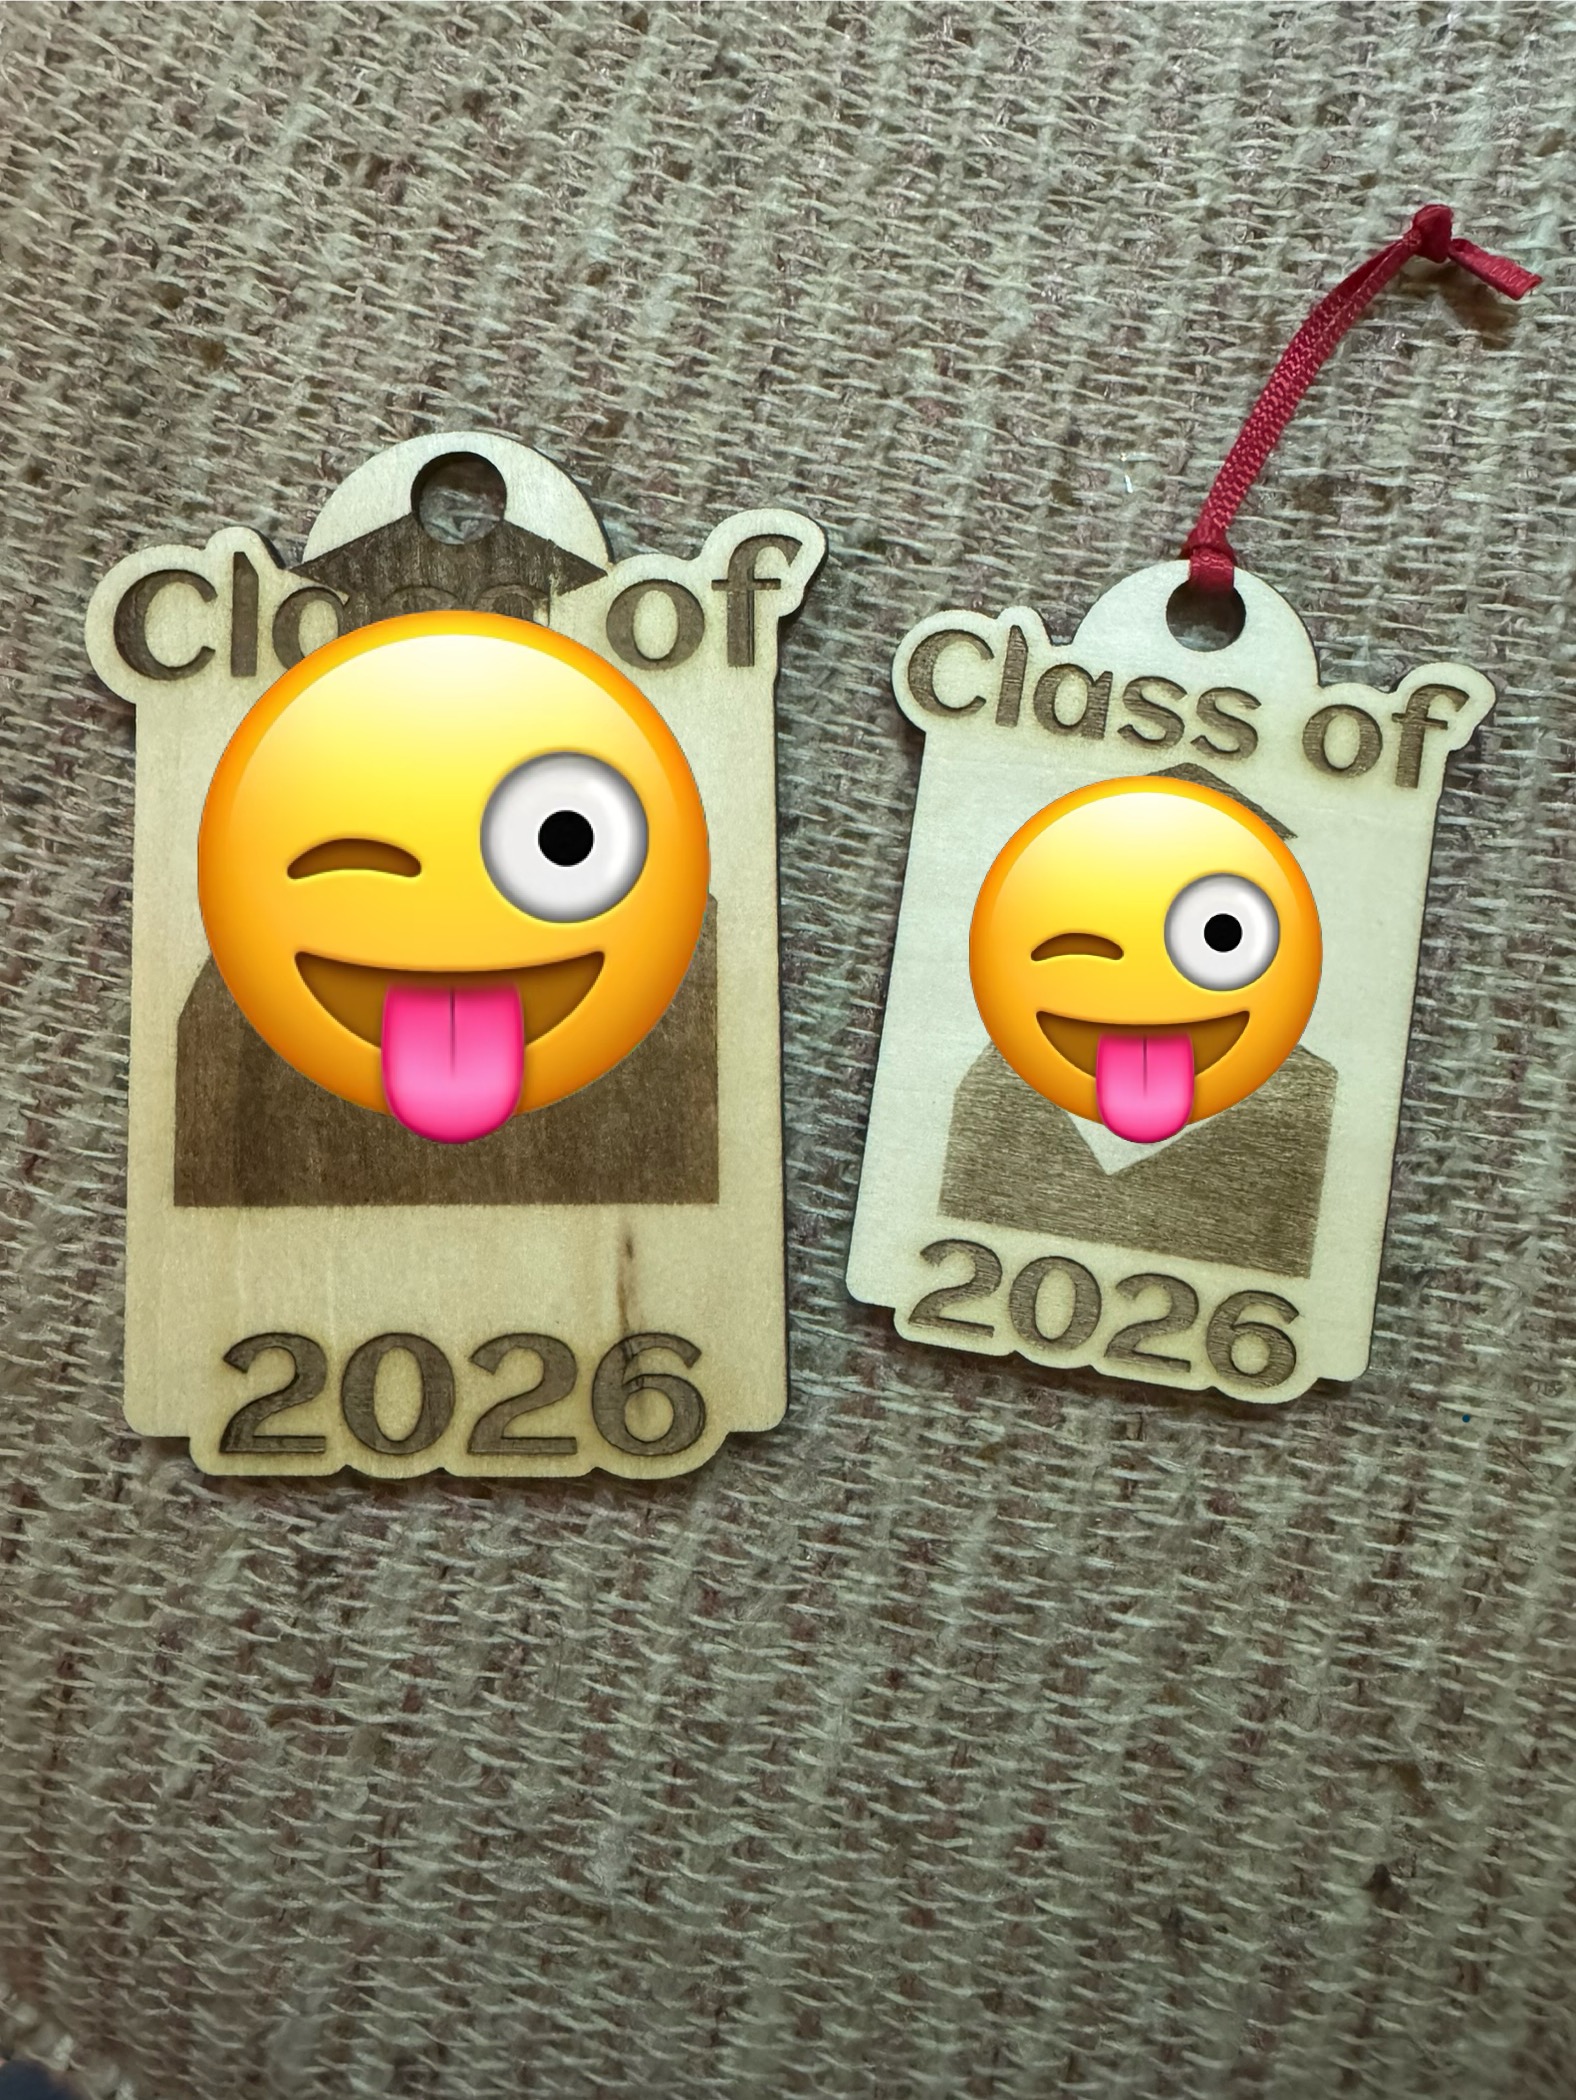
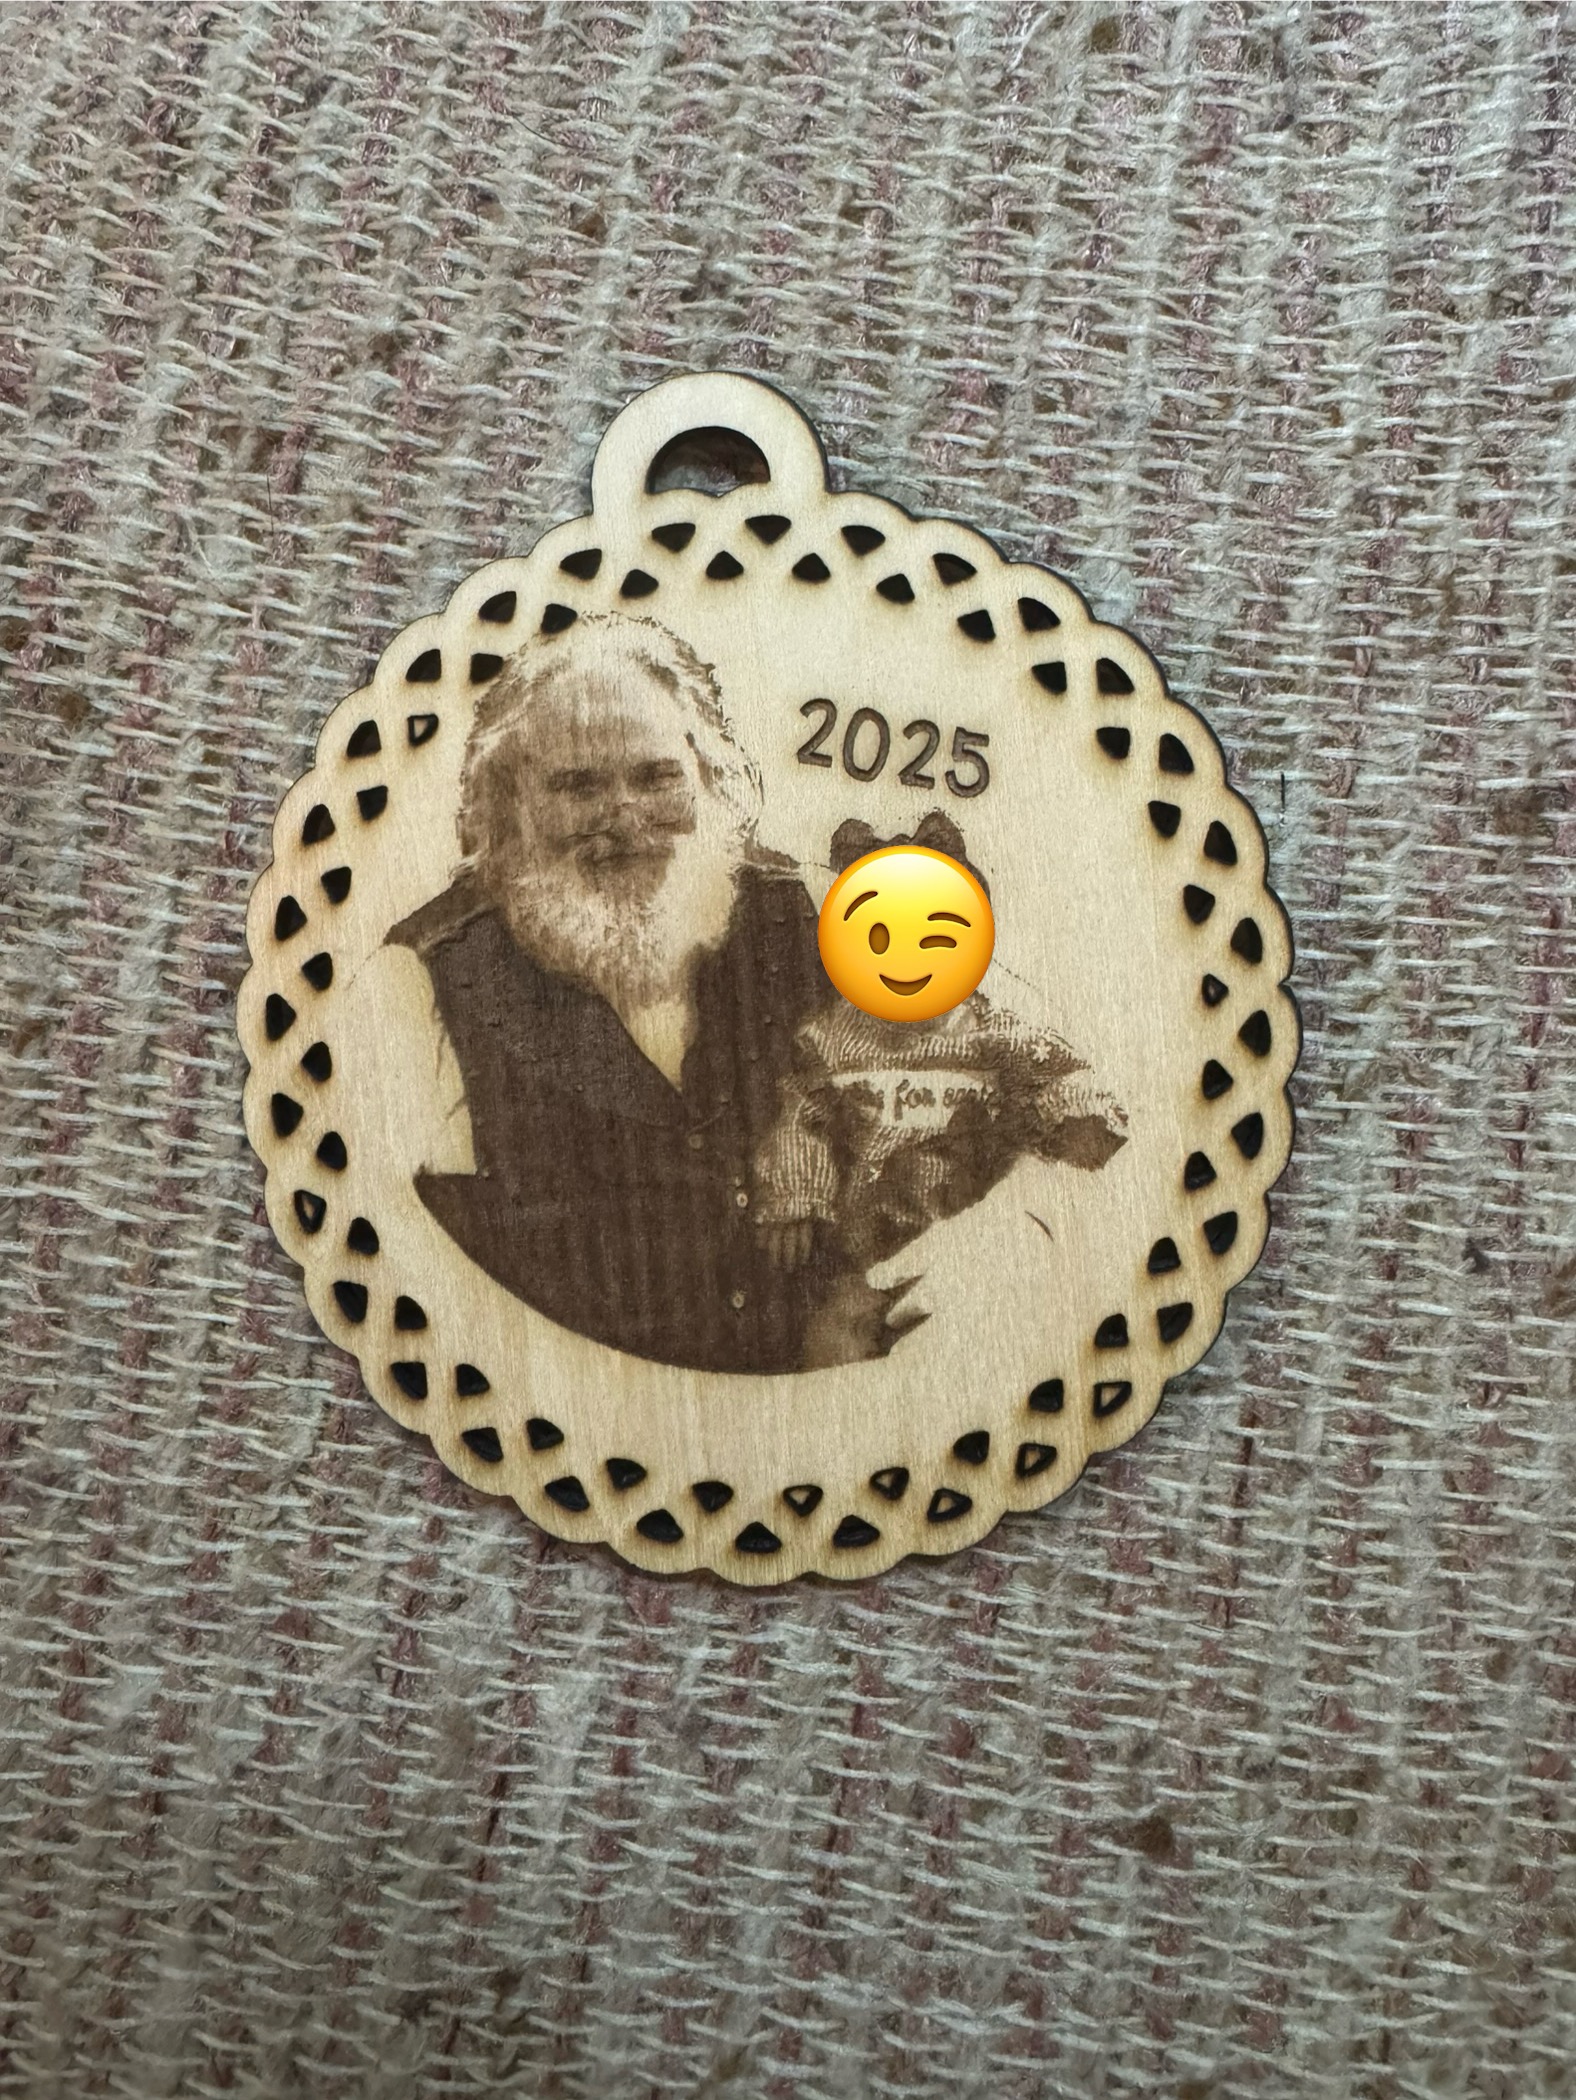
Any idea why my images sometimes are misplaced when cut? They are centered in the software. You can see I did eventually get the grad one fixed- but I don’t know how… I cut it about 10 times and just continued messing with stuff- so when I happened again today with Santa I was lost for ideas!
8 Likes
I don’t have an iEngrave but is there a machine calibration?
Do you engrave then cut? So the cut part is off? You don’t move your material at all?
Maybe @rinsky can help you further
4 Likes
I would also ask the same as @BellethehowtoGuru. Are you engraving the image first and then cutting the image? How are you stabilizing your materials in the iEngrave bed? Just as a precaution, and only because I have done it more than a dozen times myself, are you making sure the focusing foot is reseated in the laser after focusing on the wood. The times that I have had projects not cutting engraved items out correctly it has been because the material has shifted on the laser bed somehow.
4 Likes
Hi @Nancy_Lumpkin!
Sorry to hear you’ve been running into issues with your iEngrave. You might also find it helpful to check out the questions from @BellethehowtoGuru and @Cory_Barger.
For your reference, here’s a quick 101 on iEngrave cut & engrave:
• Start with a test engrave and cut without moving the wood (for example, engrave your name inside a rectangle).
• In your canvas, highlight the text using the side panel → layers. This ensures you only select the text and don’t move other elements. Then hit Make, enter your material information, and proceed to engrave.
• After engraving, press the Origin button in your software, then return to your canvas.
• Next, highlight the rectangle from the layers panel, hit Make, and proceed to cut. Be sure to enter the correct parameters for your material.
Note: This also applies to uploaded, ready-to-cut files. Adjusting layers in the side panel helps prevent unwanted movement inside your canvas.
5 Likes
They look good
3 Likes
I have my cut shape and my engrave shape on the same canvas- I set the settings for each layer- there is no movement and it engraves first-
3 Likes
So I’m setting them up on the canvas as separate layers- and setting the cut details for each layer- it’s all one task- so there is no movement- it only happens if there is an image- it doesn’t happen if there is no picture
3 Likes
Did you attach or group the elements, select the engraving layer first, and then return to the canvas to choose the cutting layer?
2 Likes
See if you put the cut layer on top so it engraves first it helps you.
1 Like
They are both on the canvas- grouped and lined up correctly- it engraves and then goes immediately to cutting- the laser never returns to origin or stops cutting- on the screen it is lined up correctly
2 Likes
The engraving is first
1 Like

This is so frustrating!!!
2 Likes
Got it—you’re running IS on mobile or iPad. I haven’t used the mobile version recently, so I’m not sure if it now allows engraving and cutting in a single task like Lightburn does. On my desktop version, when I set both parameters (engrave & cut) together, it still won’t process them in one go—that was the case two months ago on How To Use IdeaStudio App (Desktop Version) & Lightburn Software for LOKLiK iEngrave?. I’ll test again to see if IS has added this feature. In addition, did you try to engrave and cut using IS in desktop version? Just wondering.
@Cory_Barger and @Judi_B, could you confirm whether IS currently supports sending all commands in one job? Thanks in advance for your help!
1 Like
I have mine separately on mobile I do t group them
2 Likes
I’m not running from my phone- I just took the pics there for easier posting. I’m using LOKLiK software on my desktop/laptop
1 Like
Have you check if your firmware is up to date? Just wondering.
1 Like
I finally had the chance to test out the engrave and cut features in the IS Desktop version. Previously, I had to run the engrave layer separately from the cut layers, which meant creating two different tasks. Now—two months later—the IS Desktop version has been updated so we can send all commands in a single task. That’s a big improvement, but there are a few things to keep in mind for best results:
- Layer order matters: When combining engrave and cut, place the cut layer above and the engrave layer below. Don’t worry about how the layers look on your canvas—iEngrave interprets them differently than LightBurn. In LightBurn, you engrave first and then cut, but here you’ll need to swap the order.
- Secure your material: Use a full sheet of wood with strong magnets at each corner to prevent shifting. This works for smaller sheets too—just make sure they’re firmly held in place.
@Nancy_Lumpkin, looking at your screenshot, your layers need to be rearranged. If you send them to iEngrave as they are now, the wood may shift slightly if the cut runs before the engrave. I’m not sure how your honeycomb is set up, but I highly recommend using strong magnets to keep the wood stable during the job.
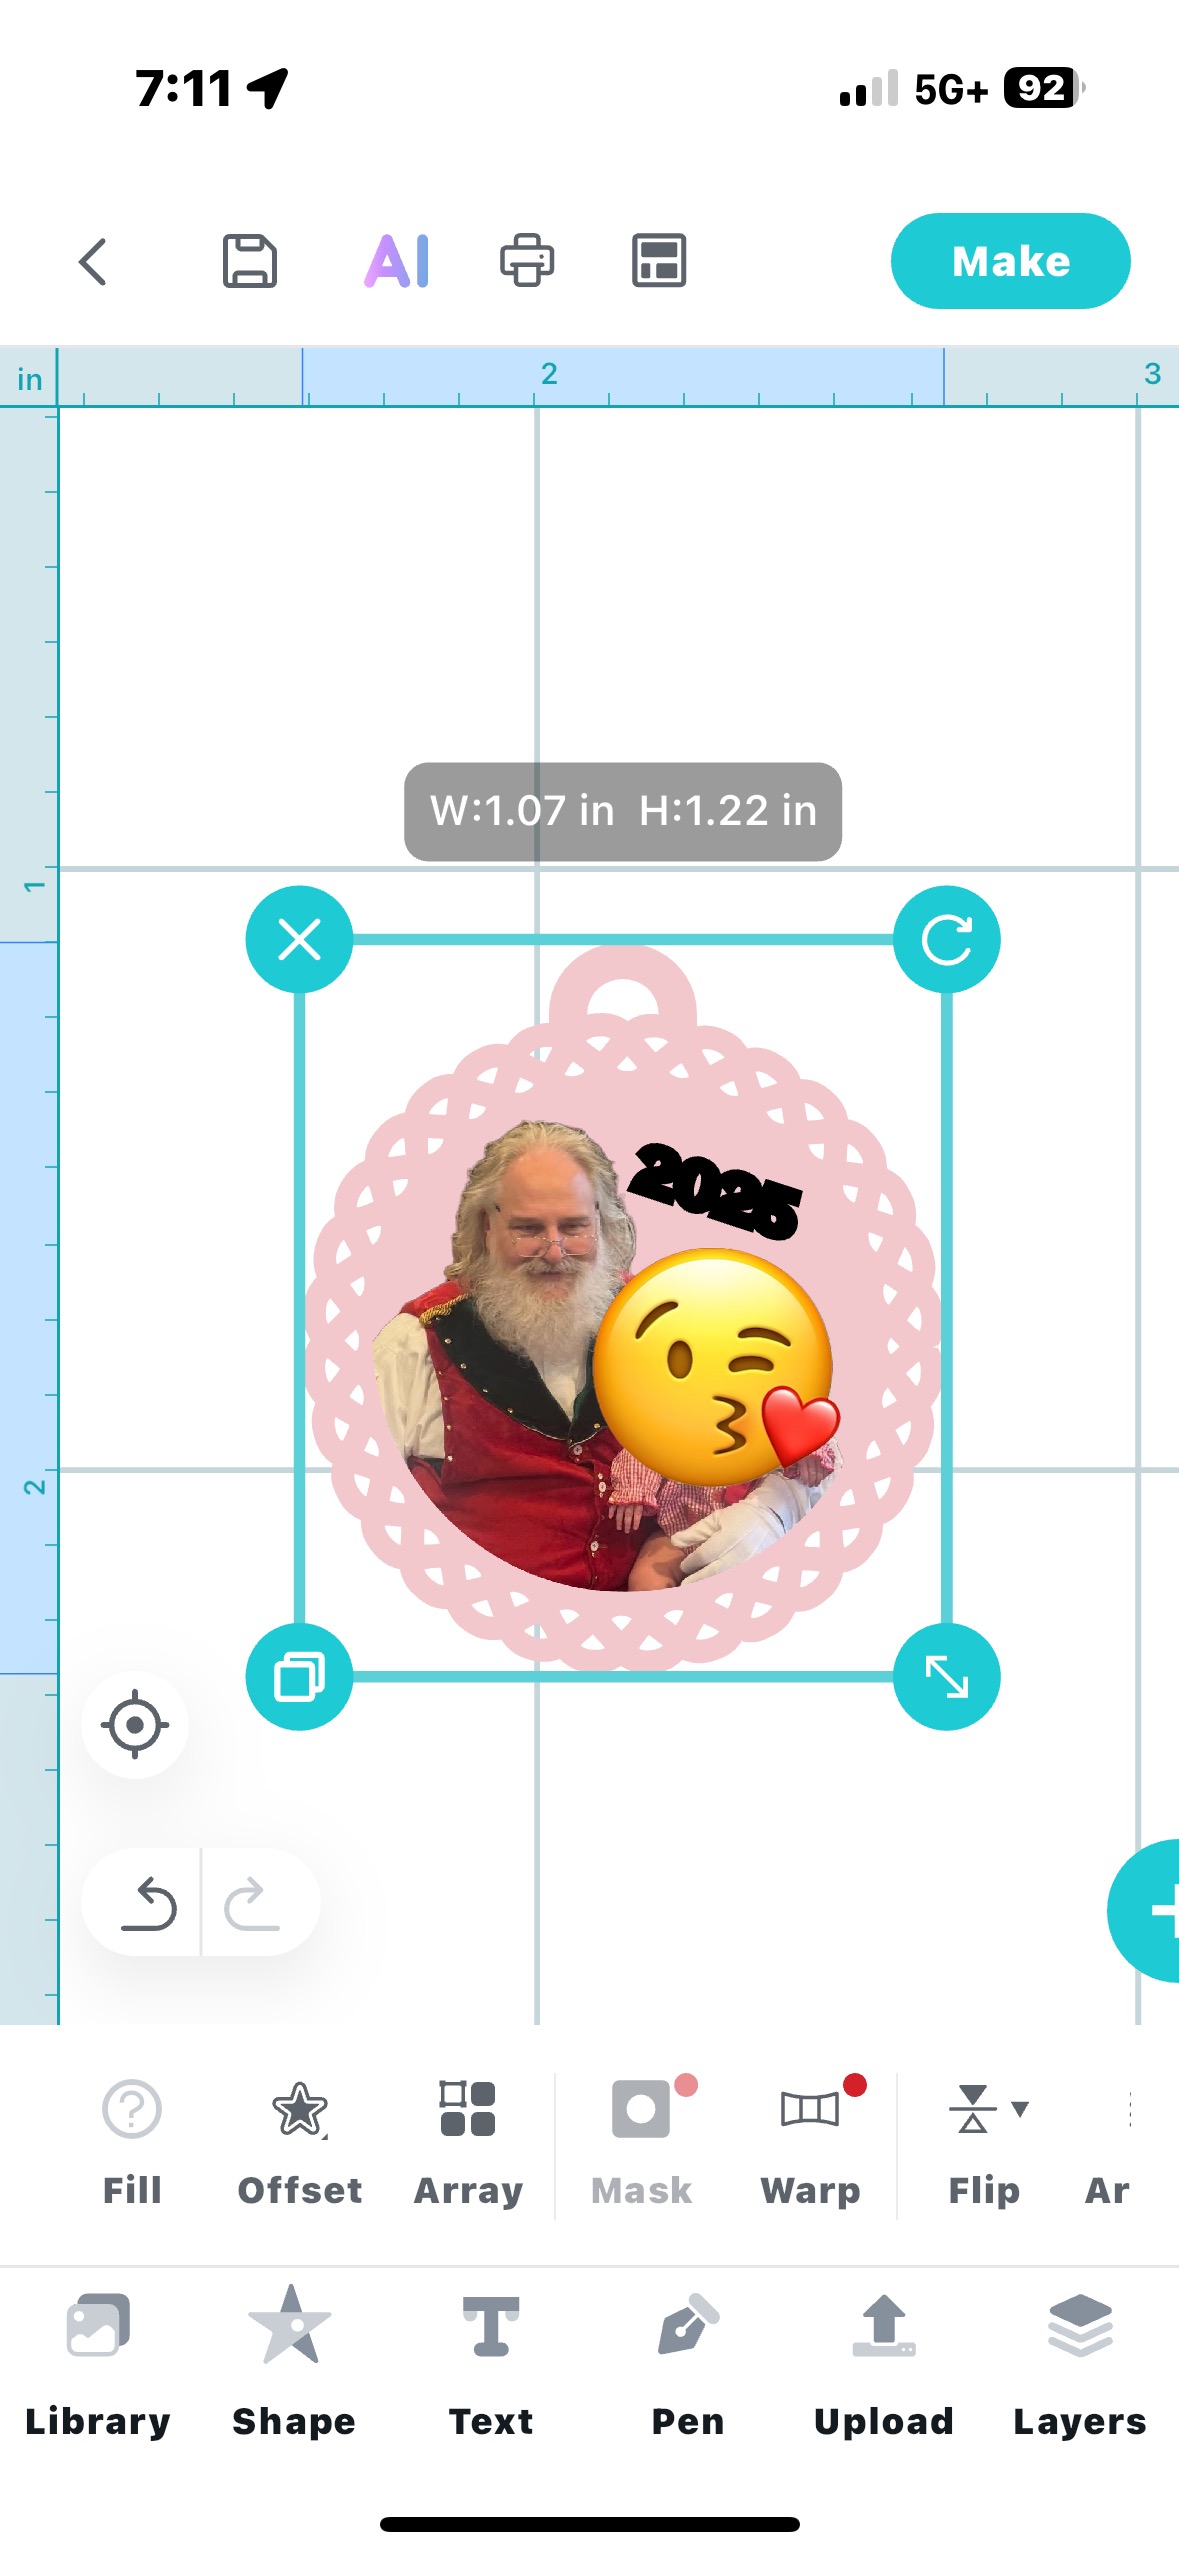
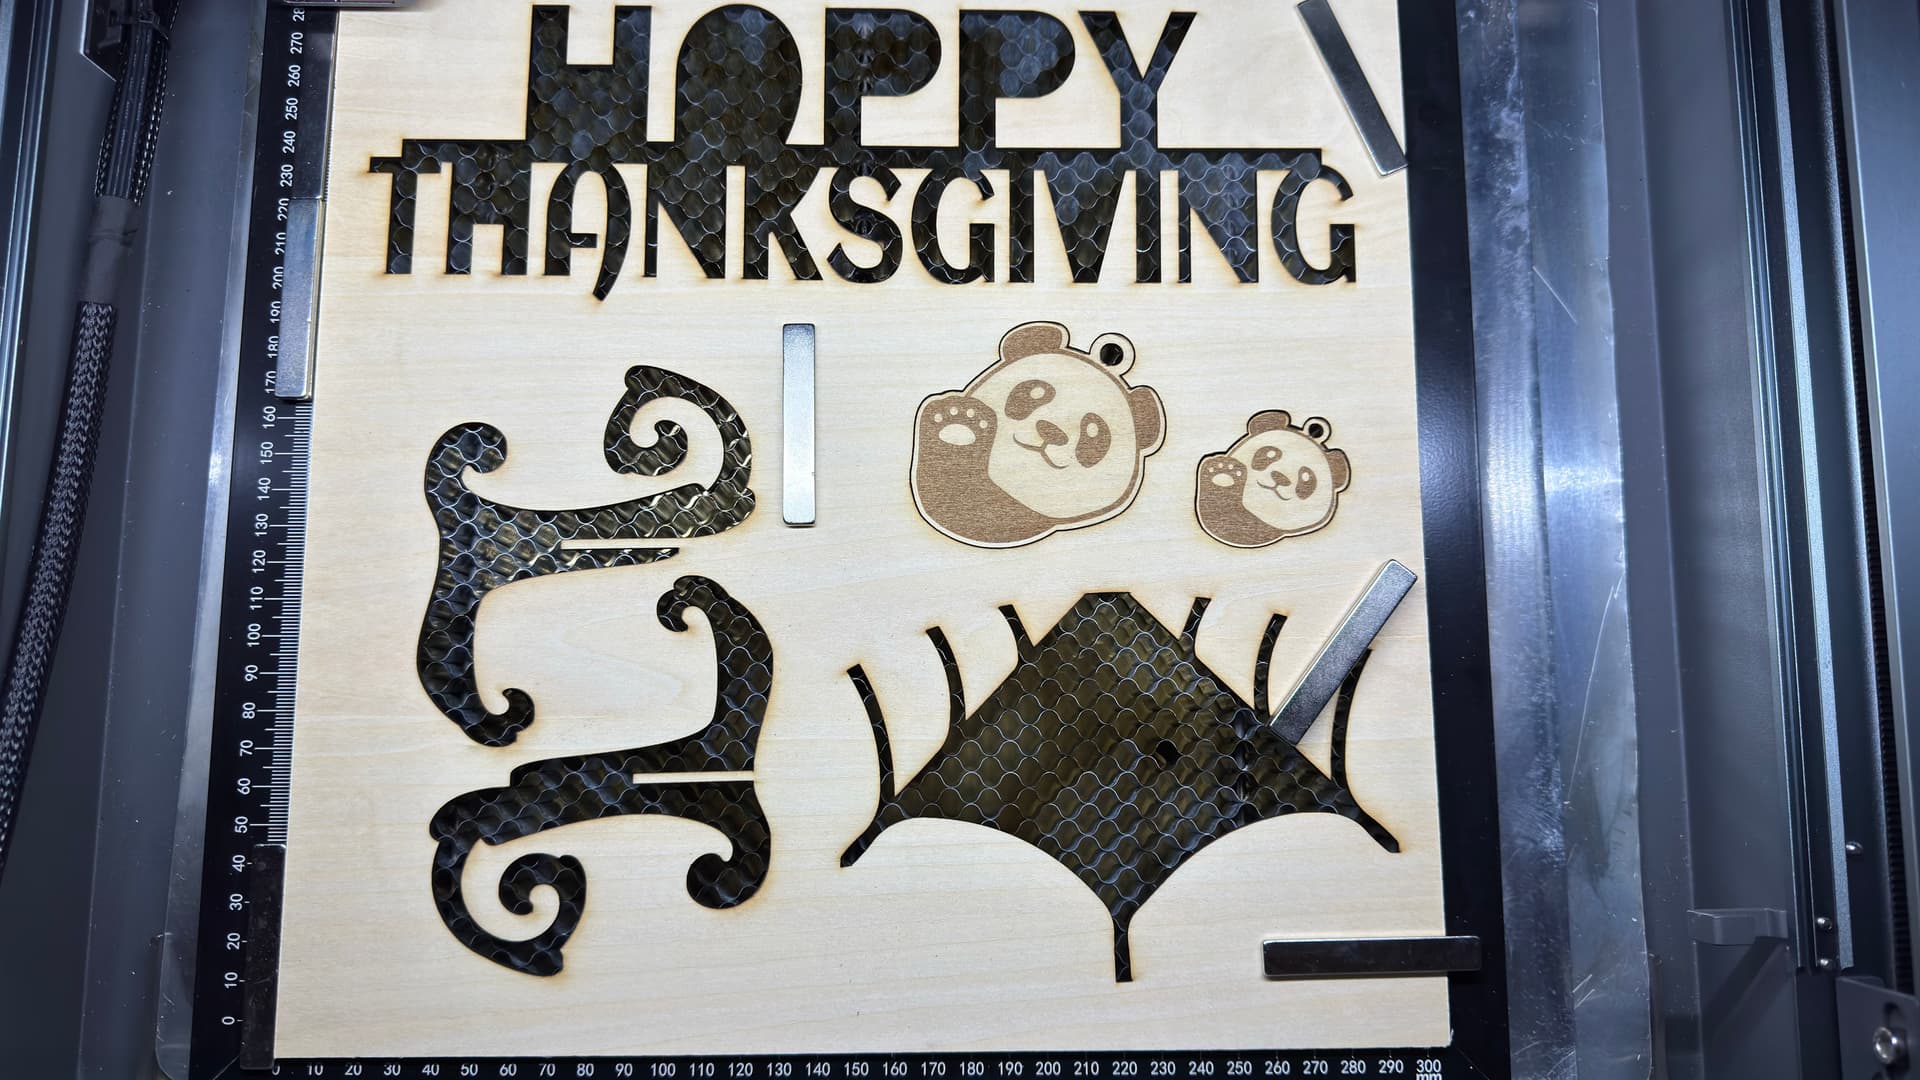
Here is my Canvas looks like:
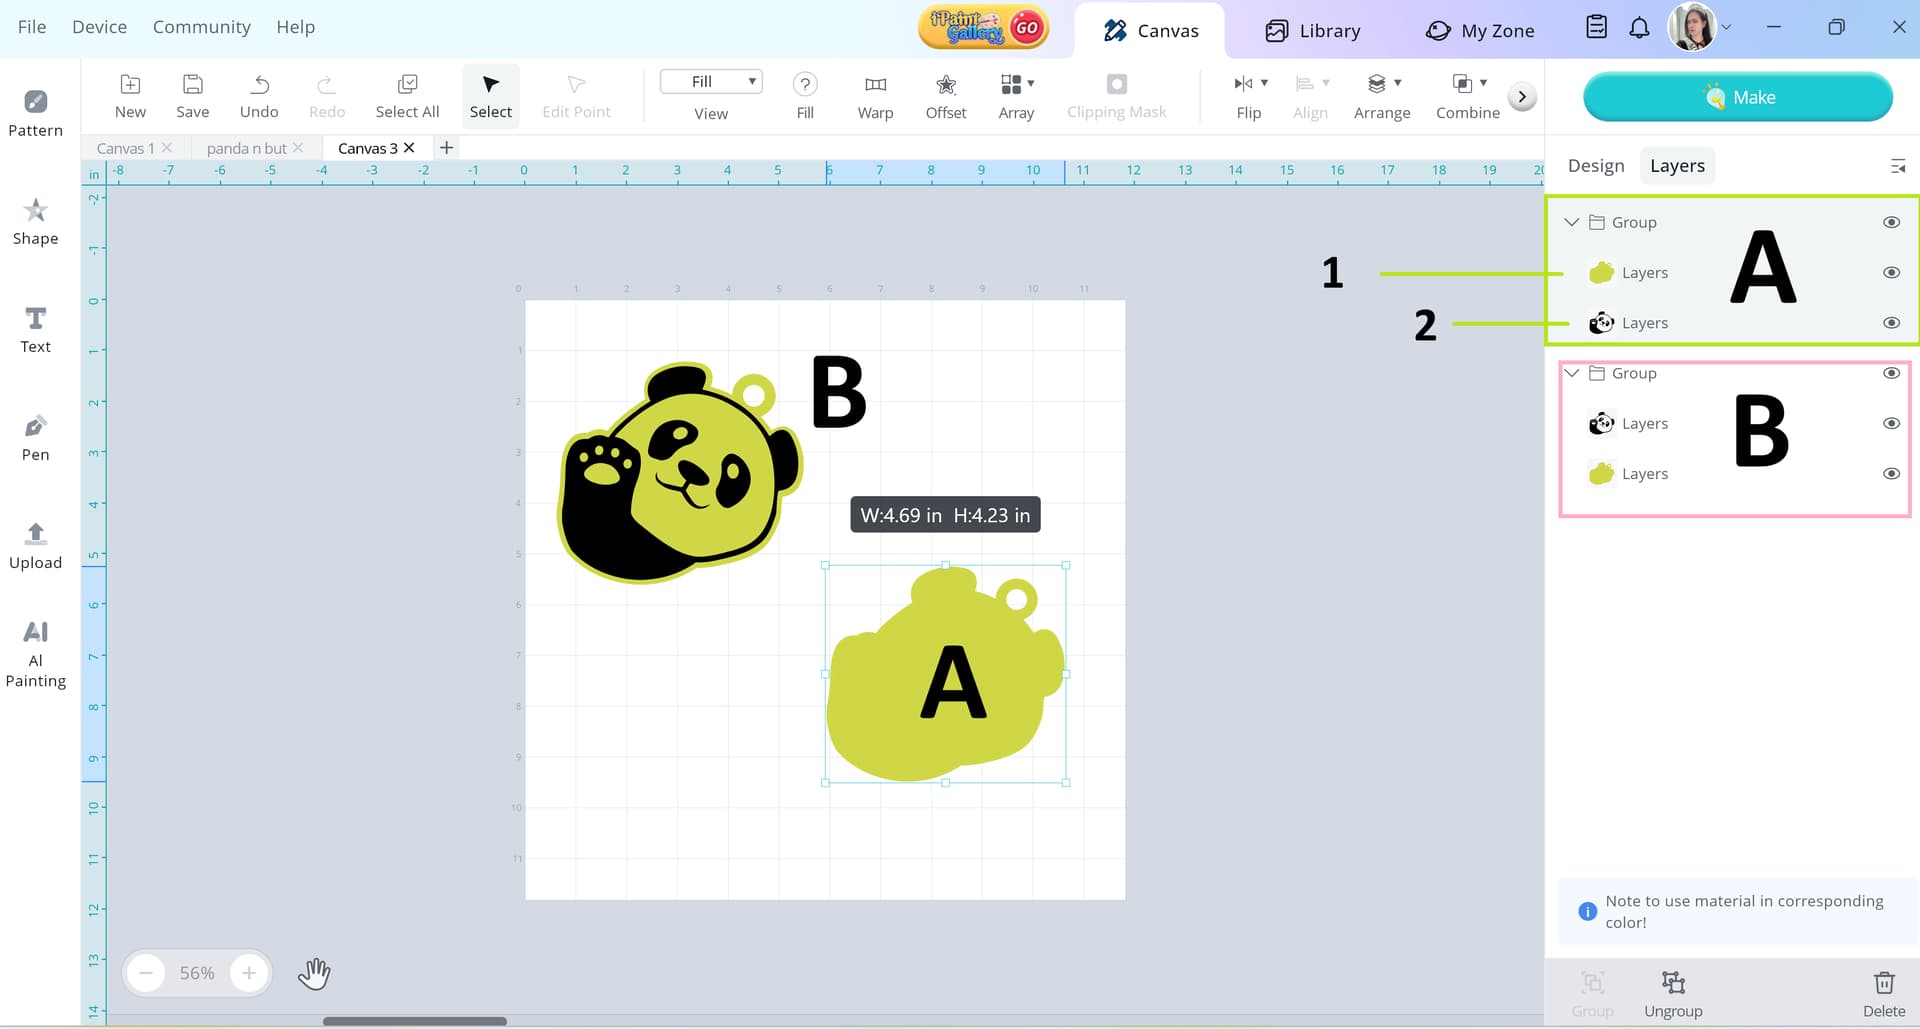
I tested both designs (A & B) and achieved excellent results—see below for details. For B (Big Panda), I ran the cut first and then the engrave. For A (Small Panda), I reversed the order, engraving first and then cutting. NOTE: To achieve the right way, the layers on A is way to go.

4 Likes
As for firmware Yes- it’s actually updates since I’ve started trying to do photos
Your tips are great- except it’s only happening when I import an image from outside sources- it works fine for a picture or clipart from the software- it only happens with photos or graphics created and uploaded
As far as moving I tape my wood to my honey comb- so no issues there
As for my layers I moved the image to the front for the screen shot so you guys could see- I’ve tried it multiple times switching the layers-
Sometimes after framing I can see that the image is off center on the task list thumbnail- but often times it looks perfect-
Thing is it will randomly work correctly- but I haven’t found a variable that is consistent to it working/not working-
You know I had the issue with the alignment earlier this year and although we “fixed” it I can’t help but thinking this might be related.
2 Likes
Got it! Did you try calibrating your iEngrave using Lightburn software by any chance? There’s some video tutorial on how to calibrate your x and y axis to get an accurate and precise engrave and cut.
1 Like